Have you ever craved a seafood dish that’s both impressive and incredibly easy to make? Well, I’ve got just the recipe for you! After years of experimenting with different fish preparations, I’ve perfected what I consider to be the absolute best garlic Parmesan flounder recipe you’ll ever try. This dish combines the delicate texture of flounder with the bold flavors of garlic, Parmesan cheese, and herbs to create a restaurant-quality meal right in your own kitchen.
As someone who’s been cooking seafood for over a decade, I can honestly say that flounder is one of the most underappreciated fish varieties out there. Its mild flavor makes it the perfect canvas for the rich, savory combination of garlic and Parmesan. Plus, it cooks in minutes, making this an ideal option for both weeknight dinners and special occasions when you want to impress without spending hours in the kitchen.
In this comprehensive guide, I’ll walk you through everything you need to know about making the perfect garlic Parmesan flounder—from selecting the freshest fish to achieving that perfectly golden, crispy topping. I’ll also share my tried-and-true tips for avoiding common pitfalls and answering those frequently asked questions that might come up along the way.
What Makes This Garlic Parmesan Flounder Special?
Before we dive into the recipe, let me tell you why this particular preparation stands out from others:
- The combination of fresh garlic and aged Parmesan creates a depth of flavor that perfectly complements the mild flounder
- A touch of lemon zest adds brightness that cuts through the richness
- The panko breadcrumb topping provides a satisfying textural contrast to the tender fish
- It’s ready in under 30 minutes, making it perfect for busy weeknights
- The dish looks and tastes impressive enough for special occasions
- It’s naturally gluten-free if you use gluten-free breadcrumbs
Ingredients You’ll Need
For this recipe, quality ingredients make all the difference. Here’s what you’ll need to serve 4 people:
| Ingredient | Amount | Notes |
|---|---|---|
| Flounder fillets | 1.5 pounds (about 4 fillets) | Fresh is best, but thawed frozen works too |
| Fresh garlic | 4-5 cloves | Minced finely |
| Parmesan cheese | 1/2 cup | Freshly grated, not the pre-packaged kind |
| Panko breadcrumbs | 1/3 cup | For a crispy topping (use gluten-free if needed) |
| Butter | 4 tablespoons | Unsalted, divided |
| Extra virgin olive oil | 2 tablespoons | Use a good quality oil |
| Fresh parsley | 3 tablespoons | Finely chopped |
| Fresh lemon | 1 medium | For zest and wedges for serving |
| Paprika | 1/2 teaspoon | Adds lovely color and mild flavor |
| Dried oregano | 1/2 teaspoon | Adds Mediterranean flavor |
| Salt | 1 teaspoon | Kosher or sea salt preferred |
| Black pepper | 1/2 teaspoon | Freshly ground |
| Cayenne pepper | 1/8 teaspoon | Optional, for a touch of heat |
Essential Kitchen Equipment
To make this recipe a success, you’ll need:
- Shallow baking dish (9×13 inches works well)
- Mixing bowls (medium and small)
- Microplane or zester for the lemon
- Measuring cups and spoons
- Sharp knife and cutting board
- Garlic press (optional but helpful)
- Pastry brush
- Aluminum foil
Preparation Steps
Step 1: Prepare the Fish
When working with flounder, proper preparation is key. Here’s how I get the fillets ready:
- Preheat your oven to 375°F (190°C).
- Rinse the flounder fillets under cold water and pat them completely dry with paper towels. This step is crucial—excess moisture will prevent that beautiful golden crust from forming.
- Inspect the fillets for any small bones that might remain and remove them with tweezers if necessary.
- Season both sides of the fillets with salt and pepper.
- Arrange the fillets in a single layer in a lightly greased baking dish.
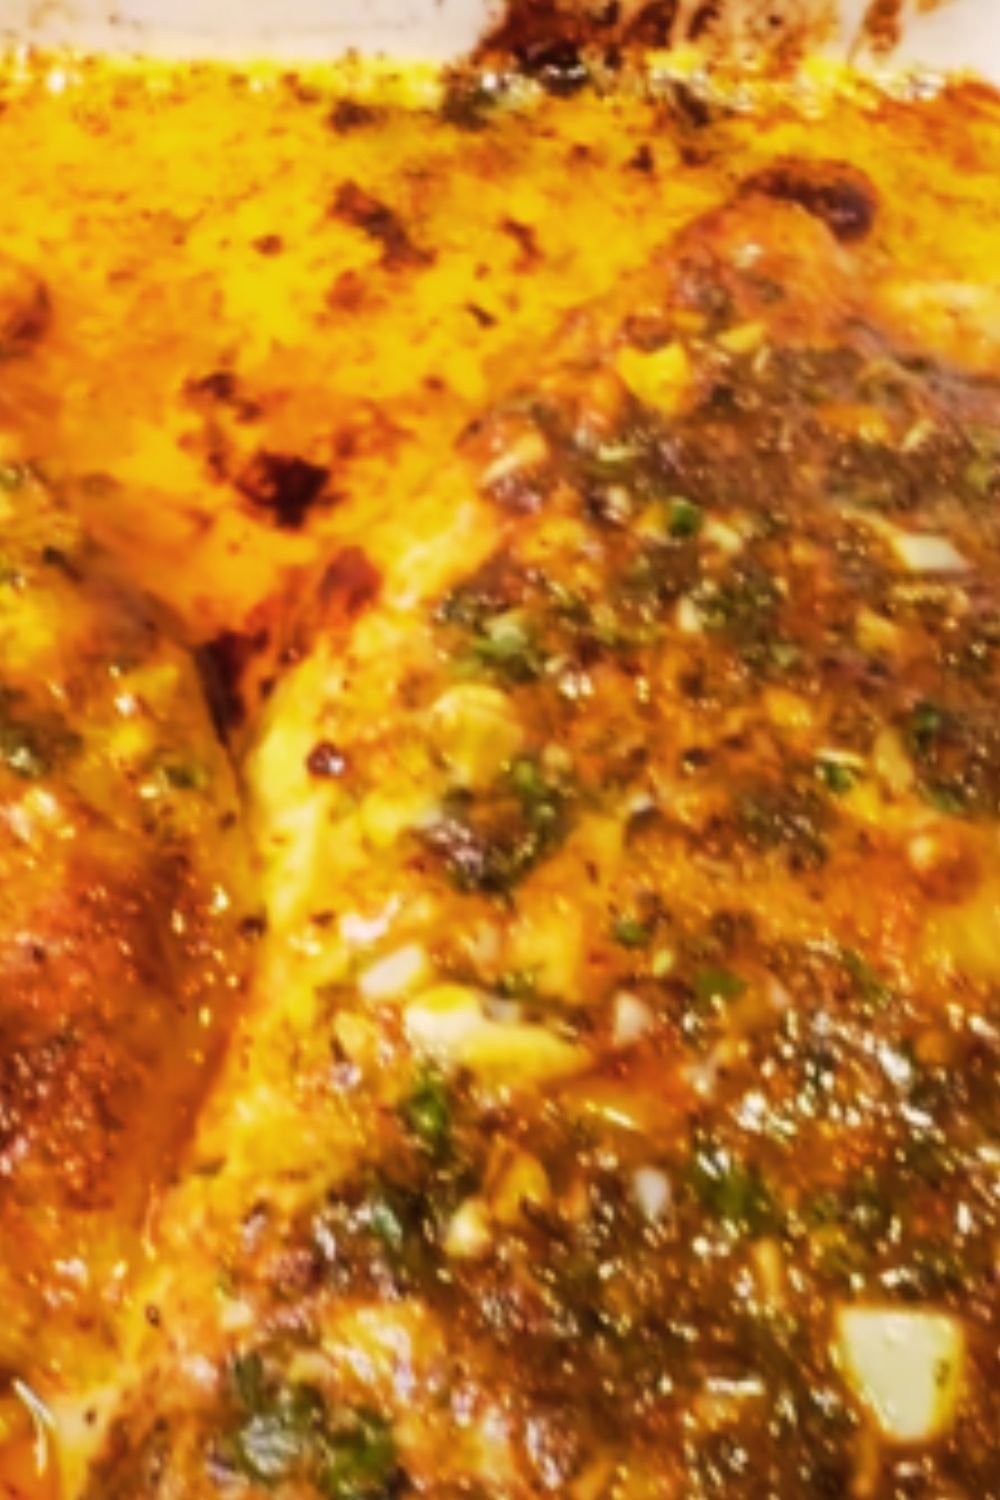
Step 2: Create the Garlic Butter Mixture
This flavorful mixture will infuse the fish with incredible taste:
- In a small saucepan, melt 3 tablespoons of butter over medium-low heat.
- Add the minced garlic and sauté for about 1 minute until fragrant but not browned.
- Remove from heat and stir in 1 tablespoon of the chopped parsley, lemon zest, and dried oregano.
- Let the mixture cool slightly, then use a pastry brush to generously coat each fillet with the garlic butter.
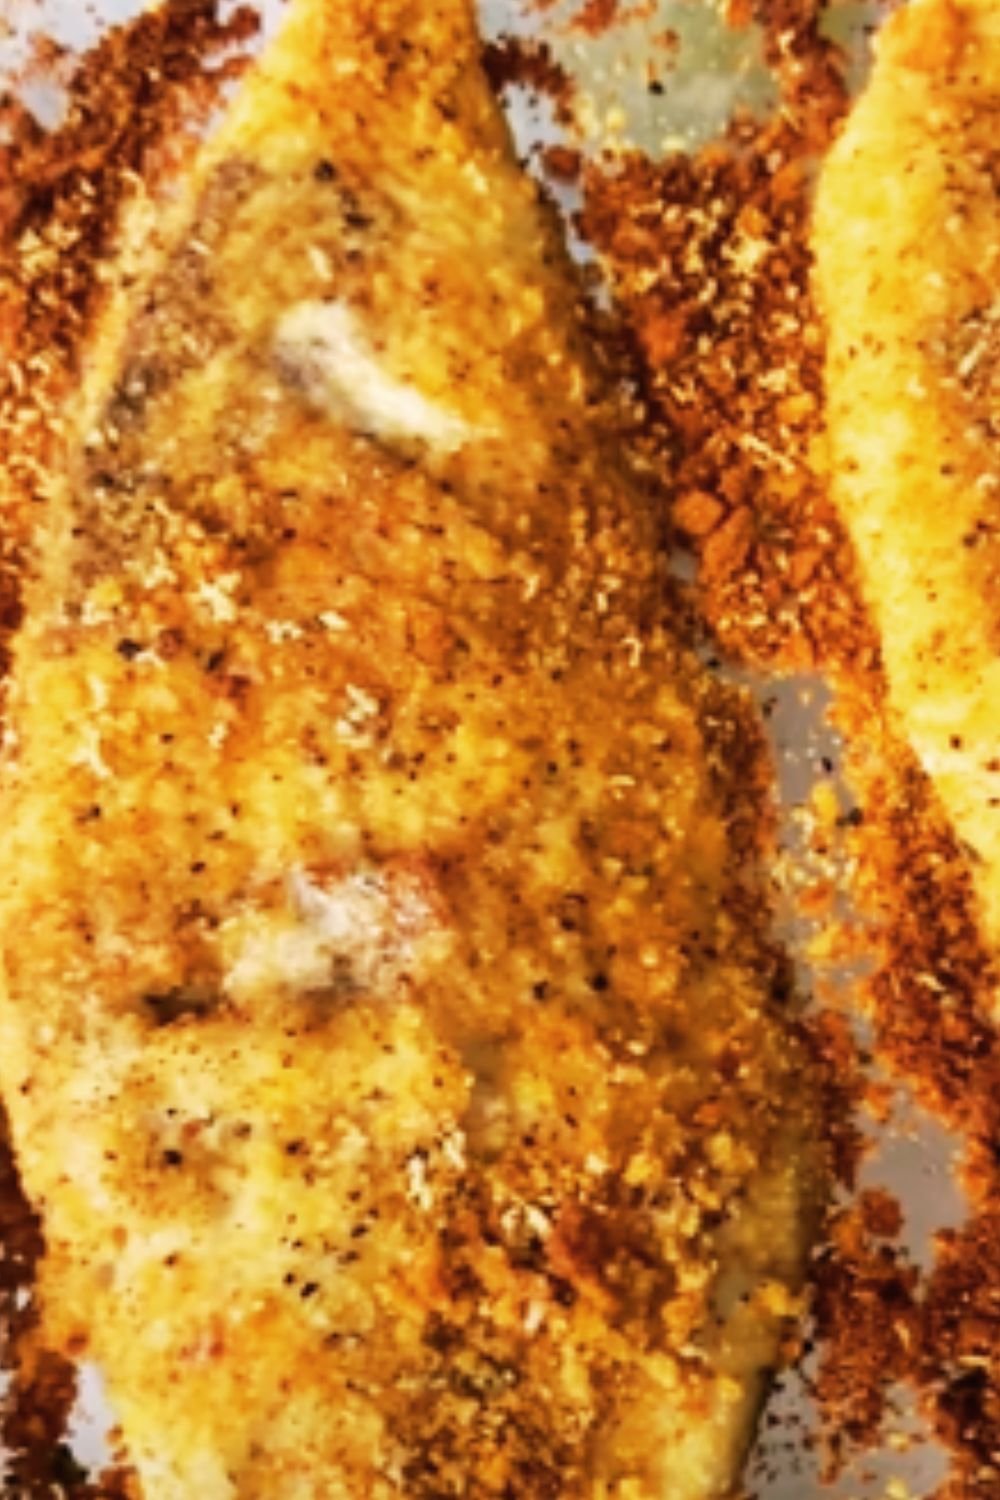
Step 3: Make the Parmesan Crust Topping
The crispy topping is what takes this dish to the next level:
- In a medium bowl, combine the panko breadcrumbs, grated Parmesan cheese, paprika, remaining 2 tablespoons of chopped parsley, and cayenne pepper (if using).
- Melt the remaining 1 tablespoon of butter and mix it with the olive oil.
- Add the butter-oil mixture to the breadcrumb mixture and stir until evenly moistened.
- Sprinkle the topping evenly over the fillets, pressing gently to adhere.
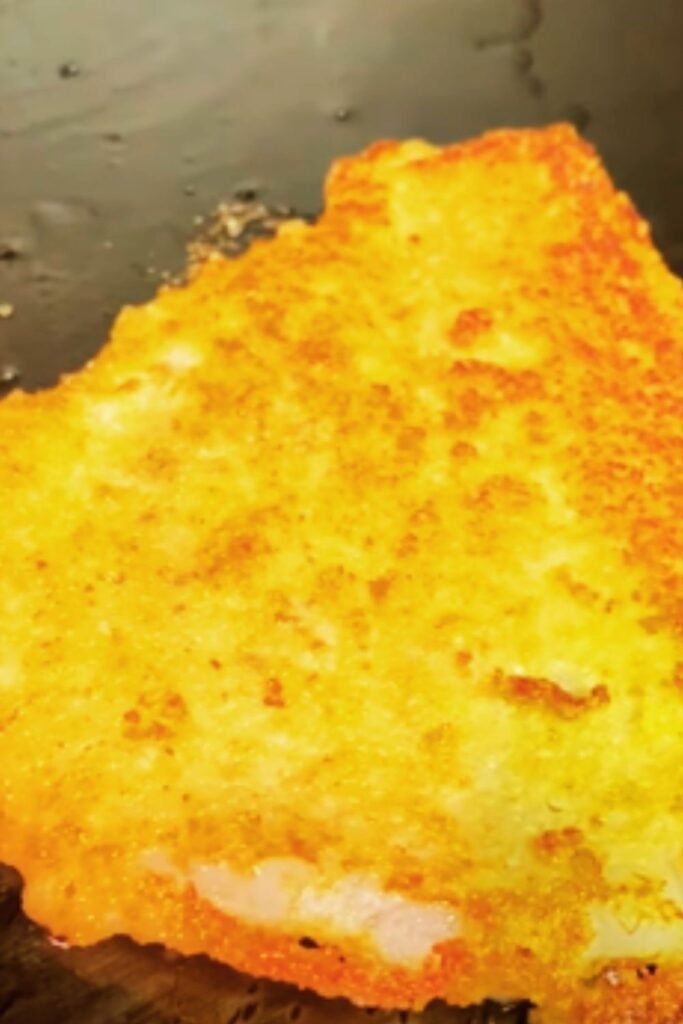
Step 4: Baking to Perfection
The baking process requires attention to detail for the best results:
- Place the baking dish in the preheated oven and bake uncovered for 15-18 minutes.
- If the topping isn’t golden brown yet, switch the oven to broil and broil for 1-2 minutes to achieve that perfect color and crispiness. Watch carefully during this step to prevent burning!
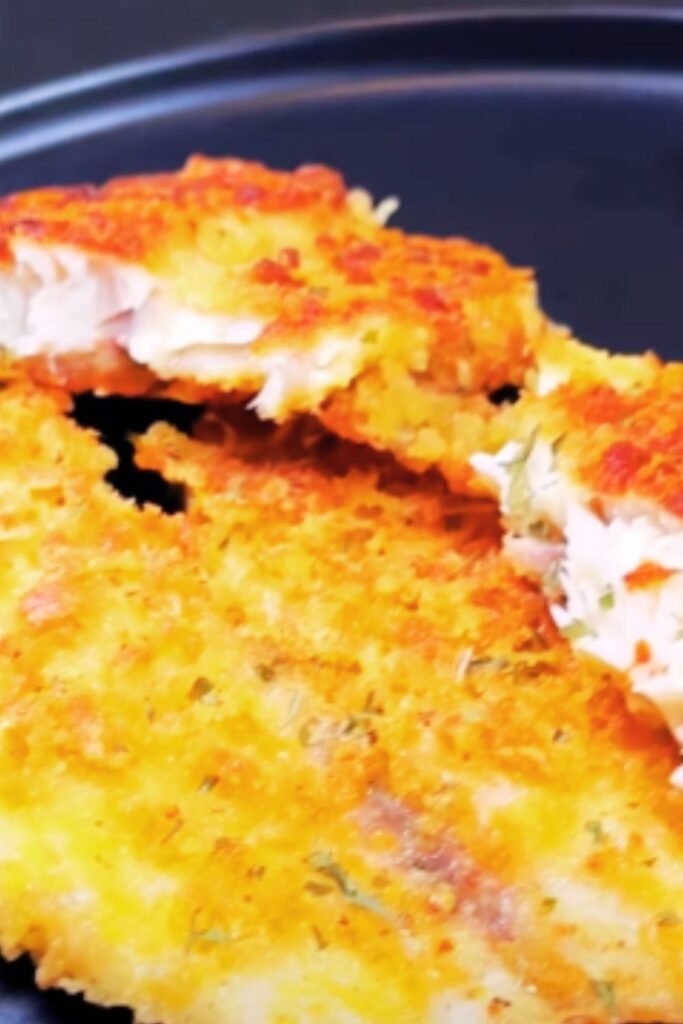
- The fish is done when it flakes easily with a fork and the internal temperature reaches 145°F (63°C).
- Remove from the oven and let rest for 2-3 minutes before serving.
Tips for Getting it Right Every Time
Throughout my years of making this dish, I’ve discovered several tips that make a big difference:
- Temperature matters: Make sure your fish is at room temperature before baking. Cold fish straight from the refrigerator will cook unevenly.
- Don’t overcook: Flounder is delicate and cooks quickly. Overcooked fish becomes dry and tough, so keep a close eye on it.
- Cheese quality: Use freshly grated Parmesan cheese rather than pre-grated. The flavor difference is noticeable, and fresh Parmesan melts better.
- Garlic prep: For the best flavor, prepare the garlic just before cooking. Pre-minced garlic from a jar won’t give you the same aromatic quality.
- Even thickness: Try to select fillets of similar thickness so they cook at the same rate.
- Pat dry thoroughly: Don’t skip the step of patting the fish dry. Excess moisture prevents browning and can make the topping soggy.
Nutritional Information
For those watching their nutritional intake, here’s a breakdown of what you can expect per serving:
| Nutrient | Amount |
|---|---|
| Calories | 295 |
| Protein | 28g |
| Total Fat | 17g |
| Saturated Fat | 8g |
| Cholesterol | 105mg |
| Carbohydrates | 5g |
| Fiber | 0.5g |
| Sugars | 0.5g |
| Sodium | 620mg |
| Calcium | 150mg |
| Iron | 1mg |
| Vitamin A | 12% DV |
| Vitamin C | 8% DV |
Variations to Try
If you’re looking to switch things up, here are some delicious variations I’ve experimented with:
Mediterranean Style
Add 1/4 cup of chopped sun-dried tomatoes and 2 tablespoons of chopped Kalamata olives to the breadcrumb mixture. Finish with a sprinkle of feta cheese during the last 5 minutes of baking.
Herb Lover’s Version
Double the herbs and add 1 tablespoon each of fresh dill, basil, and thyme to the garlic butter mixture.
Spicy Kick
Increase the cayenne to 1/4 teaspoon and add 1/2 teaspoon of red pepper flakes to the topping for a noticeable heat.
Lemon Garlic Emphasis
Double the lemon zest and add 1 tablespoon of fresh lemon juice to the garlic butter. Garnish with extra lemon slices before serving.
Serving Suggestions
To create a complete and balanced meal, I recommend pairing this garlic Parmesan flounder with:
Side Dishes
- Roasted asparagus with lemon
- Steamed green beans with slivered almonds
- Garlic mashed potatoes
- Lemon herb rice pilaf
- Sautéed spinach with garlic
- Mediterranean couscous salad
Sauces and Condiments
- Lemon aioli for dipping
- Tartar sauce with capers
- Simple butter sauce with herbs
- Roasted garlic and white bean puree
Make-Ahead and Storage Tips
Life gets busy, so here’s how to work this recipe into your meal prep routine:
Make Ahead
You can prepare the garlic butter and breadcrumb topping up to 24 hours in advance. Store them separately in airtight containers in the refrigerator. The garlic butter will solidify when chilled, so let it come to room temperature before using.
Storing Leftovers
Leftover flounder can be stored in an airtight container in the refrigerator for up to 2 days. The topping will lose some crispness, but the flavor will still be delicious.
Reheating
For best results, reheat leftovers in a 325°F (165°C) oven for about 10 minutes. Avoid using the microwave as it can make the fish rubbery and the topping soggy.
Freezing
I don’t recommend freezing this dish after cooking as the texture of both the fish and the topping will suffer significantly. However, you can freeze the uncooked fish (without the topping) for up to 2 months.

Commonly Asked Questions
Over the years, I’ve been asked many questions about making this garlic Parmesan flounder. Here are the most common ones:
Q: Can I use another type of fish if flounder isn’t available? Absolutely! This recipe works beautifully with other white fish like sole, tilapia, cod, or haddock. Just adjust the cooking time based on the thickness of the fillets.
Q: How can I tell when the fish is perfectly cooked? The fish should flake easily when tested with a fork, and it should be opaque all the way through. If you have a kitchen thermometer, the internal temperature should reach 145°F (63°C).
Q: What’s the best way to serve this dish for a dinner party? For an elegant presentation, I recommend serving this on a large platter garnished with fresh herbs and lemon wedges. You can even prepare individual portions in small gratin dishes for a restaurant-style presentation.
Q: Can I make this dish dairy-free? Yes, you can substitute the butter with olive oil or a plant-based butter alternative, and use a dairy-free Parmesan alternative. The flavor profile will be different but still delicious.
Q: How do I prevent the fish from sticking to the baking dish? Make sure to properly grease your baking dish before adding the fish. You can also line the dish with parchment paper for even easier removal and cleanup.
Q: What should I do if my topping isn’t browning properly? If your topping isn’t getting that beautiful golden color, switch your oven to broil for the last 1-2 minutes of cooking time. Just be sure to watch it carefully to prevent burning.
Q: Can I use dried herbs instead of fresh? Yes, but reduce the quantities by about half since dried herbs are more concentrated than fresh. The flavor won’t be quite the same, but it will still be delicious.
Q: Is this recipe suitable for someone with gluten intolerance? It can be! Simply substitute regular panko breadcrumbs with gluten-free breadcrumbs, and double-check that your Parmesan cheese doesn’t contain any anti-caking agents with gluten.
The Perfect Occasion
This garlic Parmesan flounder is versatile enough for any occasion. Here’s when I love to serve it:
Weeknight Family Dinner
Its quick preparation time makes it perfect for busy weeknights when you want something special without a lot of fuss.
Date Night In
Paired with a nice salad and some roasted vegetables, it makes for an impressive but easy-to-prepare romantic dinner.
Light Lunch
A smaller portion served with a fresh green salad makes for a perfect light lunch that’s satisfying without being heavy.
Dinner Party Standout
When having guests over, this dish never fails to impress, especially when served with complementary sides and a beautiful presentation.
Final Thoughts
There’s something incredibly satisfying about serving a dish that looks and tastes like it came from a high-end seafood restaurant, but was actually quite simple to prepare. This garlic Parmesan flounder has become my go-to recipe whenever I want to elevate a weeknight dinner or impress guests without spending hours in the kitchen.
The combination of delicate, flaky fish with the savory garlic-Parmesan crust hits all the right notes—crispy, tender, aromatic, and rich without being heavy. It’s the kind of dish that makes people close their eyes with that first bite and then immediately ask for the recipe.
Whether you’re a seafood enthusiast or someone who’s still finding their way around cooking fish, I guarantee this recipe will become a favorite in your household. The techniques are straightforward, the ingredients are accessible, and the results are consistently impressive.
So next time you see flounder at your local fish counter or market, grab some and give this recipe a try. I’m confident you’ll be as pleased with the results as I always am!