There’s something deeply satisfying about a whole roasted chicken. The way it fills your home with mouthwatering aromas as it cooks, the impressive presentation when you bring it to the table, and of course, the delicious taste that never fails to comfort and delight. Today, I’m sharing my absolute favorite way to elevate this classic dish: Rustic Roasted Garlic Chicken with Asiago Gravy.
This isn’t just any roast chicken recipe. It’s a carefully crafted masterpiece that combines the sweet, mellow flavor of roasted garlic with the nutty richness of aged Asiago cheese in a silky gravy that will have everyone at your table reaching for seconds (and thirds!).
I’ve been perfecting this recipe for years, tweaking and adjusting until it reached the ideal balance of flavors and textures. The chicken emerges from the oven with gloriously crispy skin and tender, juicy meat, while the gravy adds a layer of complexity that transforms the humble roast chicken into something truly extraordinary.
The Magic of Roasted Garlic
Before we dive into the recipe itself, let’s talk about one of its star ingredients: roasted garlic. If you’ve never experienced the transformation that happens when you roast garlic, you’re in for a treat.
Raw garlic is pungent, sharp, and can even be a bit aggressive. But when you roast it, something magical happens. The heat mellows the flavor dramatically, turning it sweet, nutty, and almost buttery. The cloves become soft and spreadable, perfect for incorporating into our gravy.
For this recipe, we’ll be using two whole heads of garlic – one to flavor the chicken itself, and one exclusively for the gravy. Don’t worry, it won’t be overwhelming. Roasted garlic is gentle enough that even those who typically shy away from garlic will find it delicious.
The Asiago Difference
Asiago cheese is the second secret weapon in this recipe. Originating from Italy, Asiago is a cow’s milk cheese that varies in texture depending on how long it’s aged. For our gravy, we’ll be using aged Asiago, which has a firm texture and a robust, nutty flavor that pairs beautifully with the roasted garlic.
The cheese adds a salty, umami-rich dimension to the gravy that elevates it from good to extraordinary. As it melts into the sauce, it creates a velvety texture that clings perfectly to each slice of chicken.
Ingredients for Rustic Roasted Garlic Chicken
For the Chicken:
- 1 whole chicken (approximately 4-5 pounds)
- 2 tablespoons unsalted butter, softened
- 2 tablespoons olive oil
- 1 whole head of garlic
- 1 lemon
- 4 sprigs fresh rosemary
- 4 sprigs fresh thyme
- 1 medium onion, quartered
- 1 tablespoon kosher salt
- 2 teaspoons freshly ground black pepper
- 1 teaspoon smoked paprika
- ½ teaspoon dried oregano
For the Asiago Gravy:
- Pan drippings from the roasted chicken
- 1 whole head of garlic, roasted separately
- 3 tablespoons unsalted butter
- 3 tablespoons all-purpose flour
- 2 cups chicken stock, preferably homemade
- ½ cup heavy cream
- 1 cup aged Asiago cheese, finely grated
- 1 tablespoon fresh thyme leaves
- Salt and freshly ground black pepper to taste
Essential Equipment
- Roasting pan with rack
- Aluminum foil
- Kitchen twine
- Instant-read meat thermometer
- Fine mesh sieve or strainer
- Whisk
- Saucepan

Preparation Steps
Preparing the Chicken
- Remove the chicken from the refrigerator about 30 minutes before you plan to cook it. Allowing it to come to room temperature ensures more even cooking.
- Preheat your oven to 425°F (220°C).
- Prepare the garlic: Cut the top third off a whole head of garlic to expose the cloves. Place it on a small piece of aluminum foil, drizzle with a teaspoon of olive oil, and wrap it tightly. Set aside.
- Prepare the chicken: Remove any giblets from the cavity and pat the chicken dry inside and out with paper towels. This is crucial for achieving crispy skin.
- In a small bowl, combine the softened butter, olive oil, salt, pepper, smoked paprika, and dried oregano to create a herb butter mixture.
- Gently separate the skin from the breast meat with your fingers, being careful not to tear the skin. Spread about half of the herb butter mixture under the skin, directly onto the breast meat.
- Rub the remaining herb butter mixture all over the outside of the chicken, ensuring every inch is covered.
- Cut the lemon in half. Squeeze one half over the chicken, then place both halves inside the cavity along with the wrapped garlic, rosemary sprigs, and thyme sprigs.
- Tuck the wing tips behind the chicken’s back and tie the legs together with kitchen twine to ensure even cooking.
- Place the quartered onion around the chicken in the roasting pan. These will flavor the drippings and later contribute to our gravy.
Roasting the Chicken
- Place the prepared chicken on a rack in a roasting pan, breast side up.
- Meanwhile, prepare the second head of garlic for the gravy using the same method as above (cut off the top third, drizzle with olive oil, wrap in foil).
- Place both the chicken and the separate wrapped garlic in the preheated oven.
- Roast the chicken for 15 minutes at 425°F (220°C), then reduce the temperature to 375°F (190°C) and continue roasting for approximately 1 hour and 15 minutes, or until an instant-read thermometer inserted into the thickest part of the thigh registers 165°F (74°C).
- Remove the wrapped garlic after about 45-50 minutes when it’s soft and golden.
- Once the chicken is done, transfer it to a cutting board and tent it loosely with foil. Let it rest for at least 15 minutes before carving. This allows the juices to redistribute throughout the meat, ensuring it stays moist and flavorful.
Making the Asiago Gravy
While the chicken is resting, it’s time to prepare our sumptuous Asiago gravy:
- Pour all the drippings from the roasting pan into a fat separator or a clear measuring cup. Let it sit for a few minutes so the fat rises to the top.
- In a medium saucepan, melt the butter over medium heat.
- Add the flour and whisk constantly for about 2 minutes to create a roux, which will thicken our gravy. The mixture should be golden but not browned.
- Slowly pour in the chicken stock, whisking continuously to prevent lumps.
- Squeeze the roasted garlic cloves from their skins directly into the gravy.
- Whisk in about ¼ cup of the separated pan drippings (avoiding the fat layer).
- Using an immersion blender or regular blender, purée the mixture until smooth. This incorporates the roasted garlic throughout the gravy.
- Return the gravy to the saucepan if you used a regular blender, and heat it over medium-low heat.
- Stir in the heavy cream and bring to a gentle simmer.
- Gradually add the grated Asiago cheese, stirring constantly until it’s completely melted and incorporated.
- Add the fresh thyme leaves and season with salt and pepper to taste.
- Keep the gravy warm over low heat until ready to serve, stirring occasionally.
Carving and Serving
Carving a whole chicken might seem intimidating if you haven’t done it before, but with a few simple steps, you’ll have beautiful portions ready to serve:
- Remove the kitchen twine from the legs.
- Cut through the skin between the leg and the body, then pull the leg away from the body and cut through the joint to remove the whole leg. Repeat with the other leg.
- If desired, separate the drumsticks from the thighs by cutting through the joint connecting them.
- To remove the breast meat, cut along both sides of the breastbone down the center of the chicken.
- Continue cutting downward and outward along the rib cage to remove the entire breast half in one piece. Repeat on the other side.
- Slice the breast meat crosswise into portions.
- Don’t forget the wings! Cut through the joint where the wing meets the body.
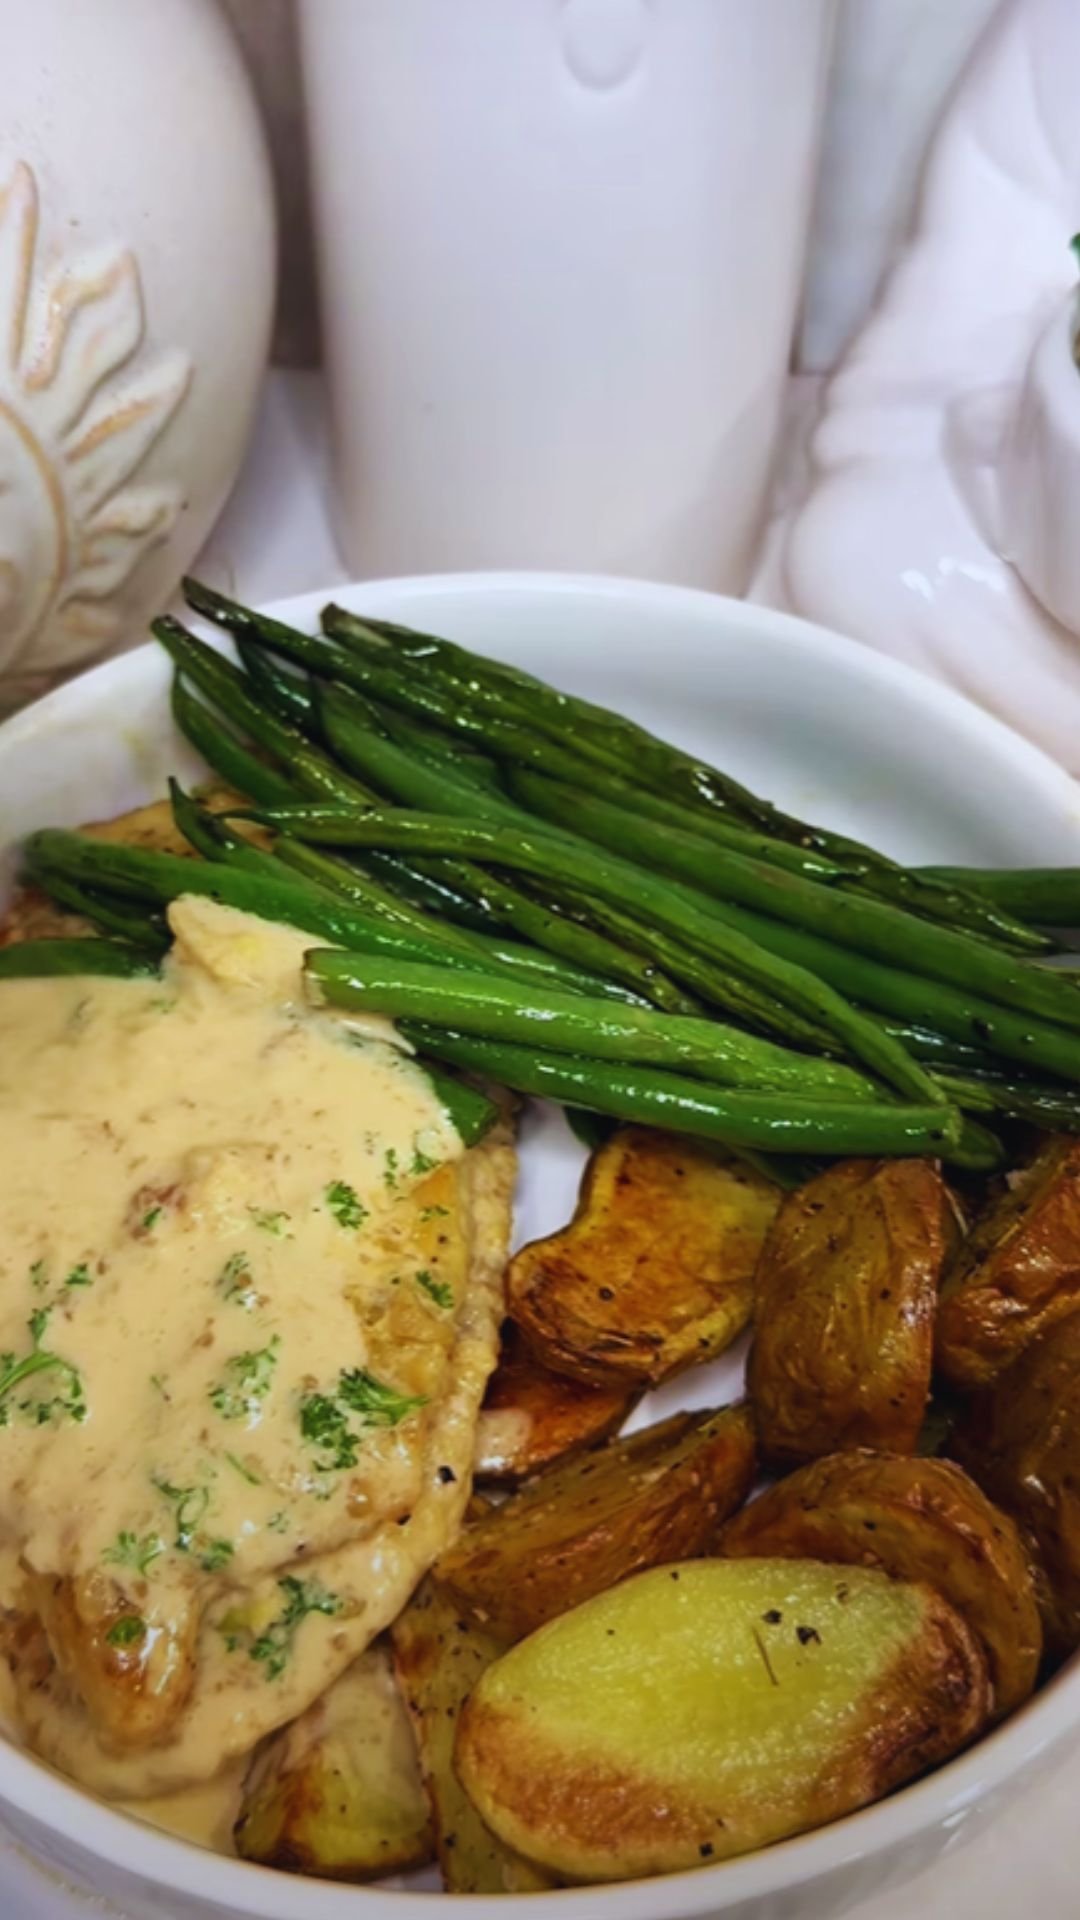
Arrange the carved chicken on a warmed platter and serve with the Asiago gravy in a gravy boat on the side, allowing guests to pour as much or as little as they like.
Serving Suggestions
This Rustic Roasted Garlic Chicken with Asiago Gravy pairs beautifully with a variety of side dishes. Here are some of my favorite accompaniments:
| Side Dish | Description | Preparation Time | Difficulty Level |
|---|---|---|---|
| Creamy Garlic Mashed Potatoes | Fluffy potatoes with a hint of garlic that perfectly complement the gravy | 30 minutes | Easy |
| Roasted Root Vegetables | Carrots, parsnips, and turnips roasted with herbs and olive oil | 45 minutes | Easy |
| Sautéed Green Beans with Shallots | Crisp-tender green beans with caramelized shallots | 15 minutes | Easy |
| Wild Rice Pilaf | Nutty wild rice with mushrooms and herbs | 50 minutes | Medium |
| Crusty Artisan Bread | Perfect for sopping up extra gravy | 10 minutes (to warm) | Easy |
| Arugula Salad with Lemon Vinaigrette | A bright, peppery contrast to the rich chicken and gravy | 10 minutes | Easy |
For a special occasion, I recommend serving all of these components together for a truly memorable feast. For a simpler weeknight dinner, choose just one or two sides to accompany the chicken.
Make-Ahead and Storage Tips
Make-Ahead Options:
- The herb butter mixture can be prepared up to 3 days in advance and stored in the refrigerator. Bring to room temperature before using.
- The chicken can be seasoned and prepared up to 24 hours in advance. Keep refrigerated and bring to room temperature before roasting.
- Roasted garlic can be prepared 2-3 days ahead and stored in an airtight container in the refrigerator.
Storage and Leftovers:
| Storage Method | Food Item | Storage Time | Notes |
|---|---|---|---|
| Refrigerator | Leftover chicken, carved | 3-4 days | Store in airtight container |
| Refrigerator | Leftover gravy | 2-3 days | May need to be thinned with a bit of stock when reheated |
| Freezer | Leftover chicken | Up to 3 months | Wrap tightly to prevent freezer burn |
| Freezer | Leftover gravy | Up to 3 months | May separate when thawed; whisk vigorously while reheating |
Reheating Guidelines:
- For the best texture, reheat leftover chicken gently in a 325°F (165°C) oven, covered with foil, for about 15-20 minutes.
- Reheat gravy in a saucepan over low heat, whisking frequently. If it’s too thick, thin it with a splash of chicken stock or water.
Variations and Substitutions
One of the joys of cooking is making a recipe your own. Here are some variations you might try:
Cheese Substitutions:
If Asiago is unavailable, you can substitute with:
- Parmesan: More salty and sharp
- Pecorino Romano: Sharper and more pungent
- Gruyère: Nuttier and meltier
Herb Variations:
- Mediterranean: Use oregano, thyme, and parsley
- Provençal: Try herbes de Provence with lavender notes
- Simple Classic: Just rosemary and thyme
Dietary Adaptations:
- Dairy-Free: Replace butter with olive oil and use coconut cream and nutritional yeast instead of cheese
- Gluten-Free: Use rice flour or cornstarch to thicken the gravy
- Lower-Fat: Use chicken breasts with skin (for flavor during cooking) and remove skin before eating
Troubleshooting Tips
Even experienced cooks encounter challenges. Here are solutions to common problems:
| Problem | Potential Cause | Solution |
|---|---|---|
| Chicken skin not crispy | Not dry enough before roasting | Pat chicken thoroughly dry and let air-dry in refrigerator for 1-2 hours before roasting |
| Undercooked chicken | Oven temperature too low or inaccurate thermometer | Always use an instant-read thermometer and check multiple spots; calibrate oven if necessary |
| Gravy too thin | Not enough flour or insufficient simmering | Mix 1 tablespoon cornstarch with 2 tablespoons cold water and stir into simmering gravy |
| Gravy too thick | Too much flour or reduced too much | Add chicken stock gradually while whisking until desired consistency |
| Gravy is lumpy | Flour not properly incorporated | Strain through a fine-mesh sieve or blend with an immersion blender |
| Cheese clumping in gravy | Added too quickly or gravy too hot | Remove from heat, let cool slightly, and add cheese more gradually while whisking constantly |
A Note on Selecting Your Chicken
The quality of your chicken makes a significant difference in the final dish. Here’s what to look for:
- Free-range or organic chickens often have better flavor and texture due to the birds’ varied diet and greater activity.
- Size matters: A 4-5 pound chicken is ideal for this recipe. Smaller birds cook more quickly but yield less meat, while larger ones take longer and may cook less evenly.
- Freshness indicators: Look for chicken with plump breasts, flexible breastbones, and no strong odor.
- Consider heritage breeds like Bresse, Plymouth Rock, or Jersey Giant for exceptional flavor, though they may be more expensive and harder to find.
The Art of Roast Chicken
Roasting a chicken perfectly is a culinary skill worth mastering. Here are some professional tips to elevate your technique:
- Trussing is optional but helps the chicken cook more evenly. If you skip it, tuck the wing tips behind the shoulders to prevent burning.
- Position matters: Start the chicken breast-side up for the entire cooking time for the most reliable results.
- Basting: Some chefs swear by it, but opening the oven repeatedly lets out heat. I find that a good initial butter rub creates perfectly crispy skin without basting.
- Let it rest: This step is non-negotiable. A proper 15-20 minute rest allows juices to redistribute throughout the meat rather than running out when you carve.
- The thigh test: In addition to using a thermometer, you can tell a chicken is done when the juices run clear (not pink) from the thigh when pierced.
Questions & Answers
Q: Can I use boneless chicken breasts instead of a whole chicken?
While you could adapt this recipe for boneless breasts, I really don’t recommend it. The bones, skin, and dark meat contribute significantly to the flavor profile of both the chicken itself and the resulting gravy. If you absolutely must use boneless breasts, reduce the cooking time considerably (to about 25-30 minutes) and consider adding extra fat like bacon to compensate for the missing skin and richness.
Q: How do I know when the chicken is fully cooked without a thermometer?
An instant-read thermometer is the most reliable method, but in a pinch, you can insert a skewer into the thickest part of the thigh. If the juices run clear (not pink), the chicken is likely done. Another test: wiggle the leg – it should move fairly easily in the socket when the chicken is fully cooked. However, for food safety and best results, I strongly recommend investing in a good meat thermometer.
Q: My gravy separated and looks curdled. What went wrong?
This usually happens when the cheese is added to gravy that’s too hot or added too quickly. To fix a broken gravy, try removing it from the heat, allowing it to cool slightly, then whisking vigorously. If that doesn’t work, you can try blending it with an immersion blender. To prevent this issue, make sure to reduce the heat before adding the cheese and incorporate it gradually while continuously whisking.
Q: Can I make this recipe dairy-free?
Yes! Replace the butter with olive oil or a plant-based butter alternative. For the gravy, use a plant-based cream alternative and either skip the cheese or use a dairy-free cheese alternative that melts well. Nutritional yeast can also add a cheese-like flavor. The result won’t be identical, but it will still be delicious.
Q: What can I do with leftover roasted garlic?
Leftover roasted garlic is culinary gold! Spread it on toast, mix it into mashed potatoes, stir it into soups, or blend it with olive oil, lemon juice, and herbs for an incredible salad dressing. Stored in an airtight container with a thin layer of olive oil on top, it will keep in the refrigerator for up to a week.
Q: How can I ensure the gravy isn’t lumpy?
The key to lump-free gravy is to create a smooth roux first by whisking the flour and butter continually, then adding the liquid gradually while whisking constantly. If you still end up with lumps, strain the gravy through a fine-mesh sieve or blend it with an immersion blender before adding the cheese.
Q: Can I use dried herbs instead of fresh?
Yes, but use about one-third the amount called for since dried herbs are more concentrated than fresh. For this recipe, that would mean about 1 teaspoon dried rosemary and 1 teaspoon dried thyme instead of the fresh sprigs. Add dried herbs to the butter mixture rather than putting them in the cavity.
Q: Is there a way to make this recipe faster for a weeknight dinner?
For a quicker version, use bone-in, skin-on chicken pieces (thighs, drumsticks, or breasts) instead of a whole chicken. They’ll cook in about 35-45 minutes. You can also roast the garlic ahead of time and refrigerate it until needed. The separate components can be prepared in advance, making assembly much faster on a busy weeknight.
Final Thoughts
Rustic Roasted Garlic Chicken with Asiago Gravy is more than just a meal—it’s an experience. From the mouthwatering aroma that fills your home as it cooks to the moment you take that first perfect bite, this dish creates memories around the dinner table.
I believe that the best recipes are those that combine simplicity with extraordinary flavor, and this one certainly fits the bill. While it might seem like there are many steps, each one builds flavor that contributes to the spectacular final result.
Whether you’re cooking for a special occasion or simply wanting to elevate your Sunday dinner, this dish delivers consistently impressive results. The combination of sweet roasted garlic, herby chicken, and nutty Asiago gravy creates a symphony of flavors that will have everyone at your table asking for the recipe.
So gather your ingredients, preheat your oven, and prepare to discover your new favorite chicken recipe. I’m confident that once you try this Rustic Roasted Garlic Chicken with Asiago Gravy, it will find a permanent place in your cooking repertoire.