There’s something magical about the smell of freshly baked cinnamon rolls wafting through the house on a lazy weekend morning. But what if we could elevate this classic treat to something even more extraordinary? Enter red velvet cinnamon rolls – a decadent fusion of two beloved desserts that creates a breakfast experience unlike any other.
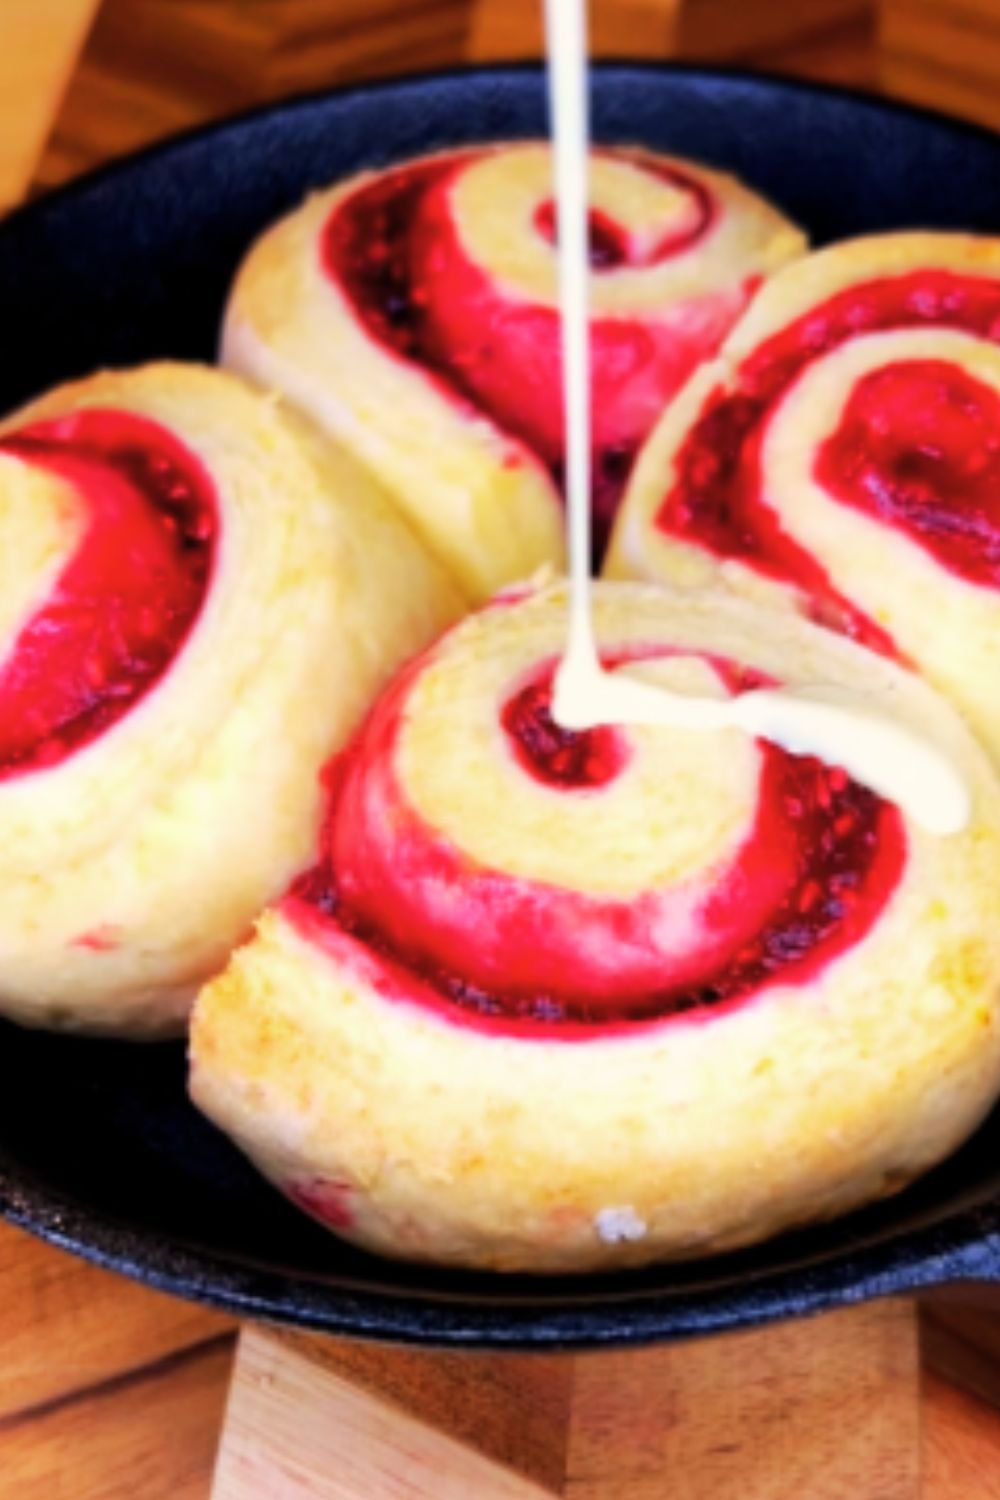
I’ve spent years perfecting this recipe, experimenting with different techniques and ingredients until I found the perfect balance of flavors and textures. These red velvet cinnamon rolls feature a soft, vibrant red dough infused with a hint of cocoa, wrapped around a buttery cinnamon-sugar filling, and topped with a luscious cream cheese frosting that melts into every crevice.
Whether you’re hosting a special holiday breakfast, planning a romantic breakfast in bed, or simply want to treat yourself to something extraordinary, these red velvet cinnamon rolls are guaranteed to impress. Let’s dive into the world of this showstopping breakfast treat that’s as beautiful as it is delicious.
What Makes These Red Velvet Cinnamon Rolls Special?
Traditional cinnamon rolls are wonderful on their own, but the red velvet twist adds several unique elements:
- Rich cocoa undertones: The subtle chocolate flavor in the dough complements the cinnamon filling beautifully
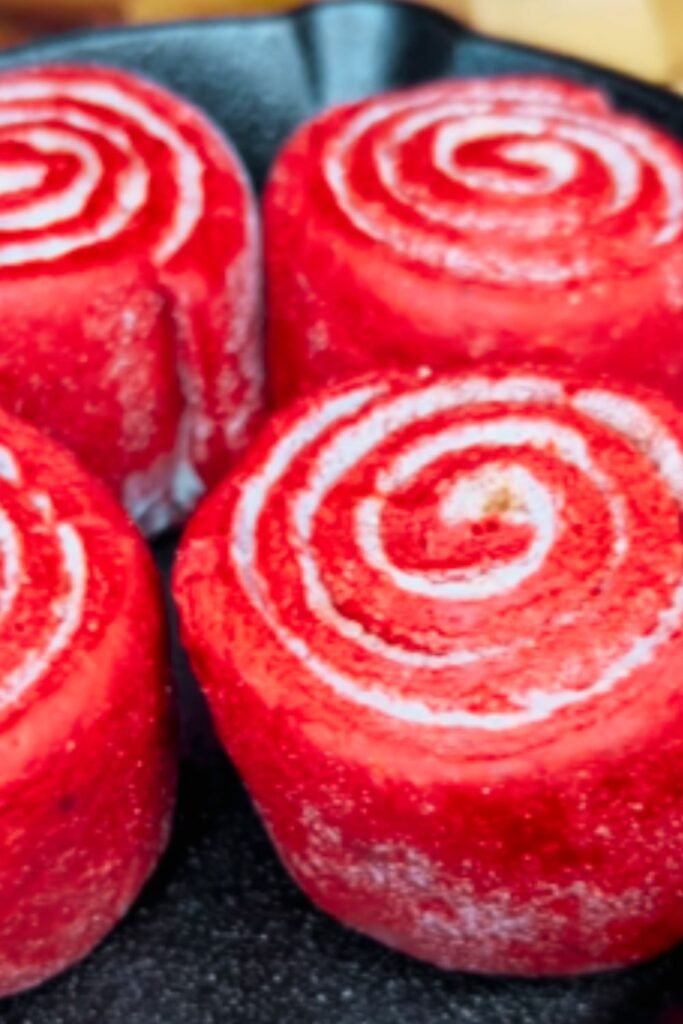
- Stunning visual appeal: The vibrant red color makes these rolls perfect for special occasions like Valentine’s Day, Christmas, or whenever you want to add a wow factor
- Perfect balance of flavors: The tangy cream cheese frosting pairs perfectly with the slightly chocolatey dough and sweet cinnamon filling
- Ultra-soft texture: The dough stays incredibly tender thanks to special ingredients and techniques
I’ve found that people who claim they don’t like red velvet often change their minds after trying these rolls. The flavor is subtle but distinctive, and the visual impact is undeniable. Let’s get started with everything you’ll need to make these stunning rolls at home.
Essential Ingredients Breakdown
The secret to exceptional red velvet cinnamon rolls lies in quality ingredients. Here’s a comprehensive breakdown of everything you’ll need and why each component matters:
For the Red Velvet Dough:
| Ingredient | Amount | Purpose | Notes |
|---|---|---|---|
| All-purpose flour | 4 cups (500g) | Forms the structure of the dough | Measure by weight for best results |
| Granulated sugar | 1/2 cup (100g) | Adds sweetness and helps activate yeast | Don’t substitute with liquid sweeteners |
| Unsalted butter | 1/3 cup (75g) | Adds richness and tenderness | Must be softened to room temperature |
| Buttermilk | 1 cup (240ml) | Creates tenderness and tanginess | Room temperature is crucial |
| Eggs | 2 large | Provides structure and richness | Room temperature ensures proper incorporation |
| Active dry yeast | 2 1/4 tsp (1 packet) | Leavening agent | Can substitute instant yeast (reduce rise time) |
| Natural unsweetened cocoa powder | 2 tbsp (15g) | Gives classic red velvet flavor | Do not use Dutch-processed cocoa |
| Red food coloring | 2-3 tbsp | Creates vibrant red color | Gel food coloring works best |
| Salt | 1 tsp | Enhances flavor and controls yeast | Don’t skip this ingredient |
| Vanilla extract | 2 tsp | Adds depth of flavor | Use pure, not imitation for best results |
For the Cinnamon Filling:
| Ingredient | Amount | Purpose | Notes |
|---|---|---|---|
| Brown sugar | 3/4 cup (150g) | Creates caramelized sweetness | Dark brown provides richer flavor |
| Ground cinnamon | 2 1/2 tbsp | Star flavor of the filling | Use fresh cinnamon for best results |
| Unsalted butter | 1/3 cup (75g) | Helps filling adhere to dough | Must be very soft but not melted |
| Cocoa powder | 1 tbsp | Enhances red velvet theme | Optional but recommended |
For the Cream Cheese Frosting:
| Ingredient | Amount | Purpose | Notes |
|---|---|---|---|
| Cream cheese | 8 oz (225g) | Base of frosting | Full-fat works best, must be softened |
| Unsalted butter | 1/4 cup (60g) | Adds richness and creaminess | Must be softened to room temperature |
| Powdered sugar | 2 cups (240g) | Sweetens and thickens frosting | Sift to remove lumps |
| Vanilla extract | 1 tsp | Adds flavor depth | Use clear vanilla for whiter frosting |
| Salt | Pinch | Balances sweetness | Don’t skip this ingredient |
Equipment You’ll Need
Having the right tools on hand makes this process much smoother:
- Stand mixer with dough hook attachment (can knead by hand, but mixer is easier)
- Rolling pin for shaping the dough
- Large mixing bowls
- Measuring cups and spoons (or kitchen scale for more precision)
- 9×13 inch baking pan (metal conducts heat better than glass)
- Pastry brush for applying butter
- Sharp knife or unflavored dental floss for cutting rolls
- Microplane or zester (optional, for adding orange zest if desired)
- Thermometer (optional, for checking liquid temperature)
I recommend preparing all ingredients and equipment before starting. This recipe has several steps, and having everything ready will make the process much more enjoyable.
Step-by-Step Instructions
Preparing the Red Velvet Dough
- Activate the yeast: Warm the buttermilk to 105-115°F (40-46°C) – it should feel like warm bathwater. Add 1 teaspoon of the sugar and sprinkle the yeast over top. Let it sit for 5-10 minutes until foamy. If it doesn’t foam, your yeast might be dead, and you’ll need to start over.
- Mix the dry ingredients: In a large bowl, whisk together 3 1/2 cups of the flour, remaining sugar, cocoa powder, and salt.
- Combine wet ingredients: In the bowl of your stand mixer, beat the softened butter until creamy. Add eggs one at a time, beating well after each addition. Pour in the yeast mixture, vanilla extract, and red food coloring. Mix until combined (it will look curdled, and that’s normal).
- Form the dough: Gradually add the dry ingredients to the wet ingredients with the mixer on low speed using the dough hook. Mix until a soft dough forms. Add the remaining 1/2 cup of flour a tablespoon at a time if the dough is too sticky. The dough should be soft and slightly tacky but not sticking to your fingers.
- Knead the dough: Increase speed to medium and knead for 5-7 minutes until the dough is smooth and elastic. When properly kneaded, it should pass the “window pane test” – you can stretch a small piece of dough thin enough to see light through it without tearing.
- First rise: Place the dough in a lightly greased bowl, cover with plastic wrap or a damp towel, and let rise in a warm place until doubled in size, about 1-1.5 hours. I like to turn my oven on to the lowest setting for 2 minutes, then turn it off and place the dough inside with the door closed.
Making the Filling and Shaping the Rolls
- Prepare the filling: While the dough rises, mix the brown sugar, cinnamon, and cocoa powder (if using) in a small bowl. Set aside.
- Roll out the dough: Once doubled, punch down the dough and turn it out onto a lightly floured surface. Roll it into a rectangle approximately 18×14 inches. The thinner you roll it, the more swirls your rolls will have.
- Add the filling: Spread the softened butter evenly over the dough, leaving a 1/2-inch border around the edges. Sprinkle the cinnamon-sugar mixture evenly over the butter, pressing it gently to adhere.
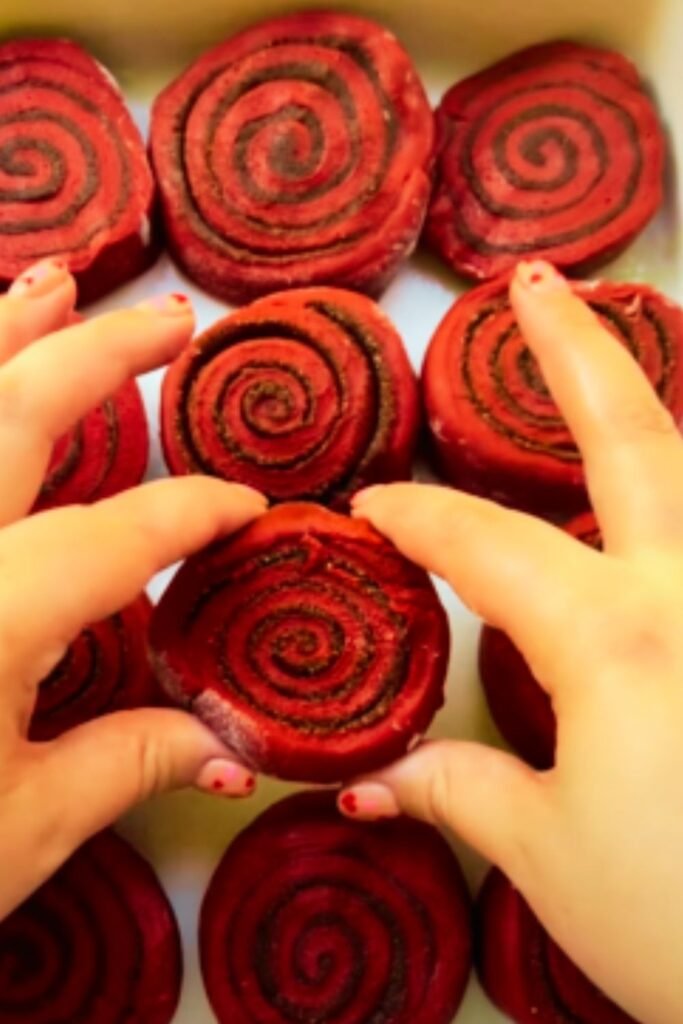
- Roll and cut: Starting from the long edge, tightly roll the dough into a log. Use a sharp knife or unflavored dental floss to cut the log into 12 equal pieces (about 1.5 inches each).
- Second rise: Place the rolls in a greased 9×13 inch baking pan, spacing them evenly. Cover with plastic wrap or a damp towel and let rise until puffy and nearly doubled, about 45-60 minutes.
Baking and Frosting
- Preheat and bake: Preheat your oven to 350°F (175°C). Bake the rolls for 22-25 minutes until just lightly golden on top. Don’t overbake, or they’ll dry out.
- Prepare the frosting: While the rolls are baking, beat the cream cheese and butter in a medium bowl until smooth and creamy. Gradually add the powdered sugar, vanilla, and salt, beating until fluffy and smooth.
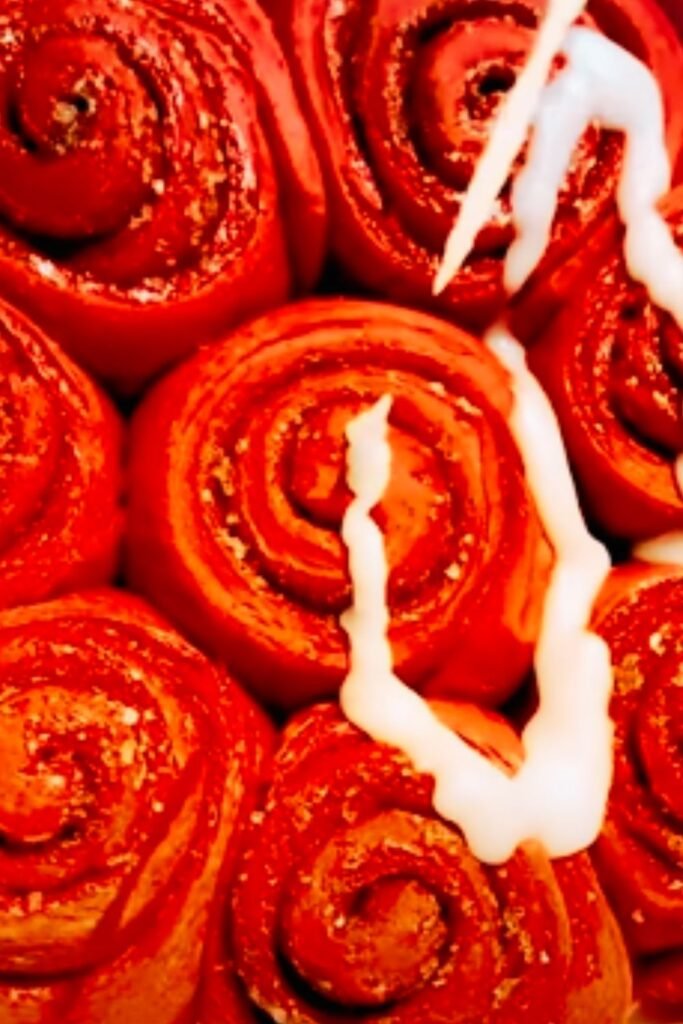
- Frost the rolls: Let the rolls cool for 5-10 minutes before spreading the frosting over them. The residual heat will partially melt the frosting, creating a gooey, delicious topping that seeps into all the crevices.
Troubleshooting Common Issues
Even experienced bakers can run into challenges. Here are solutions to the most common problems:
Dough Not Rising Properly
- Possible cause: Yeast is old or liquid was too hot/cold
- Solution: Make sure your yeast is fresh and your liquid is 105-115°F. Also ensure you’re letting the dough rise in a warm, draft-free area.
Dough Too Sticky
- Possible cause: Not enough flour or too much liquid
- Solution: Add flour 1 tablespoon at a time during kneading until the dough is tacky but not sticking to your fingers.
Filling Leaking Out
- Possible cause: Butter too melted or rolls not rolled tight enough
- Solution: Use very soft but not melted butter and roll the dough tightly. Also, don’t overfill.
Color Not Vibrant Enough
- Possible cause: Not enough food coloring or reaction with cocoa
- Solution: Use gel food coloring for more intense color without adding too much liquid. You may need to add more than you think.
Rolls Baking Unevenly
- Possible cause: Oven hot spots or rolls cut in uneven sizes
- Solution: Rotate the pan halfway through baking and try to cut rolls in equal sizes.
Make-Ahead and Storage Options
One of my favorite things about these rolls is how flexible they are for planning purposes:
Overnight Option
Prepare the rolls through the shaping step, but instead of doing the second rise, cover the pan tightly with plastic wrap and refrigerate overnight (up to 16 hours). In the morning, let the rolls sit at room temperature for 45-60 minutes before baking.
Freezing Instructions
- Unbaked rolls: After shaping but before the second rise, place in a disposable aluminum pan, cover tightly, and freeze for up to 1 month. Thaw overnight in the refrigerator, then allow to rise at room temperature for 1-2 hours before baking.
- Baked unfrosted rolls: Cool completely, wrap tightly, and freeze for up to 2 months. Thaw at room temperature and warm in a 300°F oven for 10 minutes before frosting.
- Baked and frosted rolls: Freeze in an airtight container for up to 1 month. Thaw in the refrigerator overnight.
Storage Tips
- Room temperature: Store leftover frosted rolls covered for up to 2 days.
- Refrigerator: Store for up to 5 days. Microwave for 15-20 seconds to warm before serving.
Serving Suggestions and Variations
These red velvet cinnamon rolls are versatile and can be customized in many ways:
Perfect Pairings
- Hot coffee or espresso
- Cold milk
- Hot chocolate
- Fresh fruit platter
- Smoothies
Creative Variations
To make these rolls even more special, try these variations:
- White Chocolate Red Velvet Rolls: Add 1/2 cup white chocolate chips to the filling and sprinkle some on top of the frosting.
- Orange-Infused Red Velvet Rolls: Add 1 tablespoon of orange zest to the dough and 1 teaspoon to the frosting for a bright citrus note.
- Cream Cheese Filled Red Velvet Rolls: Before rolling, spread a thin layer of sweetened cream cheese (4 oz cream cheese + 2 tbsp sugar + 1 tsp vanilla) over the butter and under the cinnamon sugar filling.
- Red Velvet Cinnamon Roll Cake: Place the rolls in a round cake pan, allowing space between each. After baking, they’ll join together but maintain their swirl pattern for a beautiful presentation.
Nutritional Information
While these red velvet cinnamon rolls are definitely a treat, it’s helpful to know what you’re consuming:
| Nutrient | Amount per Roll |
|---|---|
| Calories | 385 |
| Total Fat | 16g |
| Saturated Fat | 10g |
| Cholesterol | 75mg |
| Sodium | 220mg |
| Total Carbohydrates | 55g |
| Dietary Fiber | 1.5g |
| Sugars | 28g |
| Protein | 6g |
Note: Nutritional values are approximate and may vary based on specific ingredients used.
Expert Tips for Perfect Rolls Every Time
After years of making these rolls, I’ve gathered some insider tips that make a huge difference:
- Temperature matters: All refrigerated ingredients should be at room temperature for proper incorporation.
- Measure precisely: For the most consistent results, measure flour by weight not volume. If using cups, spoon flour into the cup and level with a knife rather than scooping directly.
- Don’t rush the rises: Properly risen dough creates the perfect texture. Look for visual cues (doubled in size) rather than strictly following time guidelines.
- The butter shortcut: For the filling, grate cold butter over the rolled dough instead of spreading softened butter. It distributes more evenly and won’t tear the dough.
- Cutting technique: For the cleanest cuts, use unflavored dental floss. Slide it under the roll, cross the ends over the top, and pull to cut through without squishing.
- Pan spacing: Space the rolls about 1 inch apart in the pan so they have room to expand but will still touch after baking.
- Frosting consistency: For a more drizzle-like frosting, add 1-2 tablespoons of heavy cream or milk to thin it out.
- Visual doneness cue: Look for just a hint of golden color on the highest points of the rolls. The internal temperature should be 190°F if you’re using a thermometer.
Frequently Asked Questions
Q: Can I make these without the red food coloring?
A: Absolutely! The rolls will have a light brown color from the cocoa powder and will still taste delicious. You can also experiment with natural food colorings like beet powder, but the color won’t be as vibrant.
Q: Why do you use buttermilk in the recipe?
A: Buttermilk serves multiple purposes: it activates the yeast, adds tanginess that complements the cream cheese frosting, and creates a tender crumb structure through its acidity. If you don’t have buttermilk, you can make a substitute by adding 1 tablespoon of white vinegar or lemon juice to 1 cup of milk and letting it sit for 5 minutes.
Q: Can I make these rolls gluten-free?
A: While I haven’t personally tested a gluten-free version, readers have reported success using a 1:1 gluten-free flour blend that contains xanthan gum. The texture will be slightly different, and you may need to adjust the liquid ratio. The dough won’t be as elastic, so handle it gently.
Q: How do I know when the dough has been kneaded enough?
A: The dough should be smooth, elastic, and slightly tacky but not sticky. The best test is the “window pane test” – take a small piece of dough and gently stretch it with your fingers. If it can stretch thin enough to see light through without tearing, it’s ready. If it tears easily, continue kneading.
Q: Why did my cream cheese frosting come out lumpy?
A: This usually happens when the cream cheese and/or butter isn’t soft enough. Both should be at room temperature for at least an hour before making the frosting. If you still have lumps, try warming the mixture very gently over a double boiler while whisking constantly.
Q: Can I halve this recipe?
A: Yes! The recipe halves beautifully for a smaller batch. Use a 9-inch round or 8-inch square pan instead of the 9×13-inch pan.
Q: My rolls didn’t turn out bright red. What happened?
A: The cocoa powder can mute the red color somewhat. For a brighter red, you can either increase the food coloring or decrease the cocoa powder slightly (though this will affect the flavor). Gel food coloring generally produces brighter results than liquid.
Q: Why do you recommend using dental floss to cut the rolls?
A: Dental floss creates clean cuts without compressing the dough the way a knife might, which helps the rolls maintain their perfect spiral shape. If using a knife, make sure it’s very sharp and use a gentle sawing motion rather than pressing straight down.
In Conclusion
These red velvet cinnamon rolls represent the perfect marriage of two beloved desserts, creating something truly greater than the sum of its parts. The vibrant color makes them perfect for special occasions, while their incredible flavor and texture make them worthy of any weekend breakfast.
I find there’s something deeply satisfying about working with yeasted dough – the transformation from simple ingredients into something so beautiful and delicious feels almost magical. The process may take time, but the results are well worth the effort.
Whether you’re a seasoned baker or trying homemade cinnamon rolls for the first time, I hope you’ll give this recipe a try. The look on your family’s faces when you bring these to the table will be all the reward you need. And remember, baking is both an art and a science – don’t be afraid to adjust and experiment to make this recipe your own.
Happy baking!