I’ve been experimenting with air fryer recipes for years, and I can confidently say that these Garlic Parmesan Chicken Skewers have become my absolute favorite weeknight dinner. There’s something magical about the way the air fryer transforms simple chicken pieces into golden, crispy perfection while infusing them with the bold flavors of garlic and parmesan. The best part? They’re ready in under 20 minutes, making them perfect for busy families who don’t want to compromise on taste.
When I first started using my air fryer, I was amazed by how it could create restaurant-quality results with minimal effort. These chicken skewers embody everything I love about air frying – they’re crispy on the outside, juicy on the inside, and packed with flavor. The garlic parmesan coating creates a beautiful golden crust that rivals any deep-fried version, but with significantly less oil and mess.
What Makes These Chicken Skewers Special
My journey with this recipe began when I was looking for a way to make chicken more exciting for my family. Traditional grilled chicken often left us wanting more flavor, and baked chicken sometimes turned out dry. The air fryer changed everything. The circulating hot air creates an incredibly even cook while the garlic parmesan mixture forms a delicious crust that locks in all the juices.
Crispy Coating: The combination of panko breadcrumbs, fresh parmesan, and perfectly seasoned garlic powder creates a coating that’s both crunchy and flavorful.
Juicy Interior: The high heat and efficient air circulation ensure the chicken stays moist and tender while achieving that perfect golden exterior.
Versatile Preparation: These skewers work beautifully as a main dish, appetizer, or even sliced over salads for a protein-packed meal.
Essential Ingredients Breakdown
Understanding each ingredient’s role helps you achieve the best results every time. I’ve tested various combinations and proportions to perfect this recipe.
Primary Ingredients
Boneless Chicken Thighs or Breasts : I prefer thighs for their superior flavor and moisture retention, but breasts work excellently too. Cut into 1.5-inch cubes for optimal cooking.
Fresh Parmesan Cheese : Grated fresh parmesan provides the best flavor and texture. Pre-grated works in a pinch, but fresh makes a noticeable difference.
Panko Breadcrumbs : These Japanese-style breadcrumbs create superior crispiness compared to regular breadcrumbs. Their larger, airier texture is perfect for air frying.
Fresh Garlic : Minced fresh garlic delivers the most robust flavor. I use about 4-5 cloves for optimal garlic presence without overwhelming the dish.
Seasoning Components
Italian Seasoning : A blend of oregano, basil, thyme, and rosemary that complements the parmesan beautifully.
Paprika : Adds subtle smokiness and contributes to the golden color.
Salt and Black Pepper : Essential for enhancing all the other flavors.
Olive Oil : A light coating helps the breadcrumb mixture adhere and promotes even browning.

Complete Recipe Instructions
Preparation Phase
I always start by preparing all my ingredients before beginning the cooking process. This ensures smooth execution and prevents any mishaps.
Step 1: Prepare the Chicken Cut your chicken into uniform 1.5-inch cubes. This size ensures even cooking throughout. Pat the pieces completely dry with paper towels – this step is crucial for achieving maximum crispiness.
Step 2: Create the Coating Mixture In a large bowl, combine 1 cup panko breadcrumbs, ¾ cup freshly grated parmesan cheese, 4 minced garlic cloves, 1 teaspoon Italian seasoning, ½ teaspoon paprika, 1 teaspoon salt, and ½ teaspoon black pepper. Mix thoroughly until all ingredients are evenly distributed.
Step 3: Season the Chicken Place the chicken cubes in a separate bowl and drizzle with 2 tablespoons olive oil. Toss until each piece is lightly coated. This oil helps the seasoning adhere and promotes browning.
Assembly Process
Step 4: Coat the Chicken Working with a few pieces at a time, roll the oiled chicken cubes in the breadcrumb mixture, pressing gently to ensure the coating adheres well. I find it helpful to use one hand for handling the chicken and keep the other clean for managing the coating.
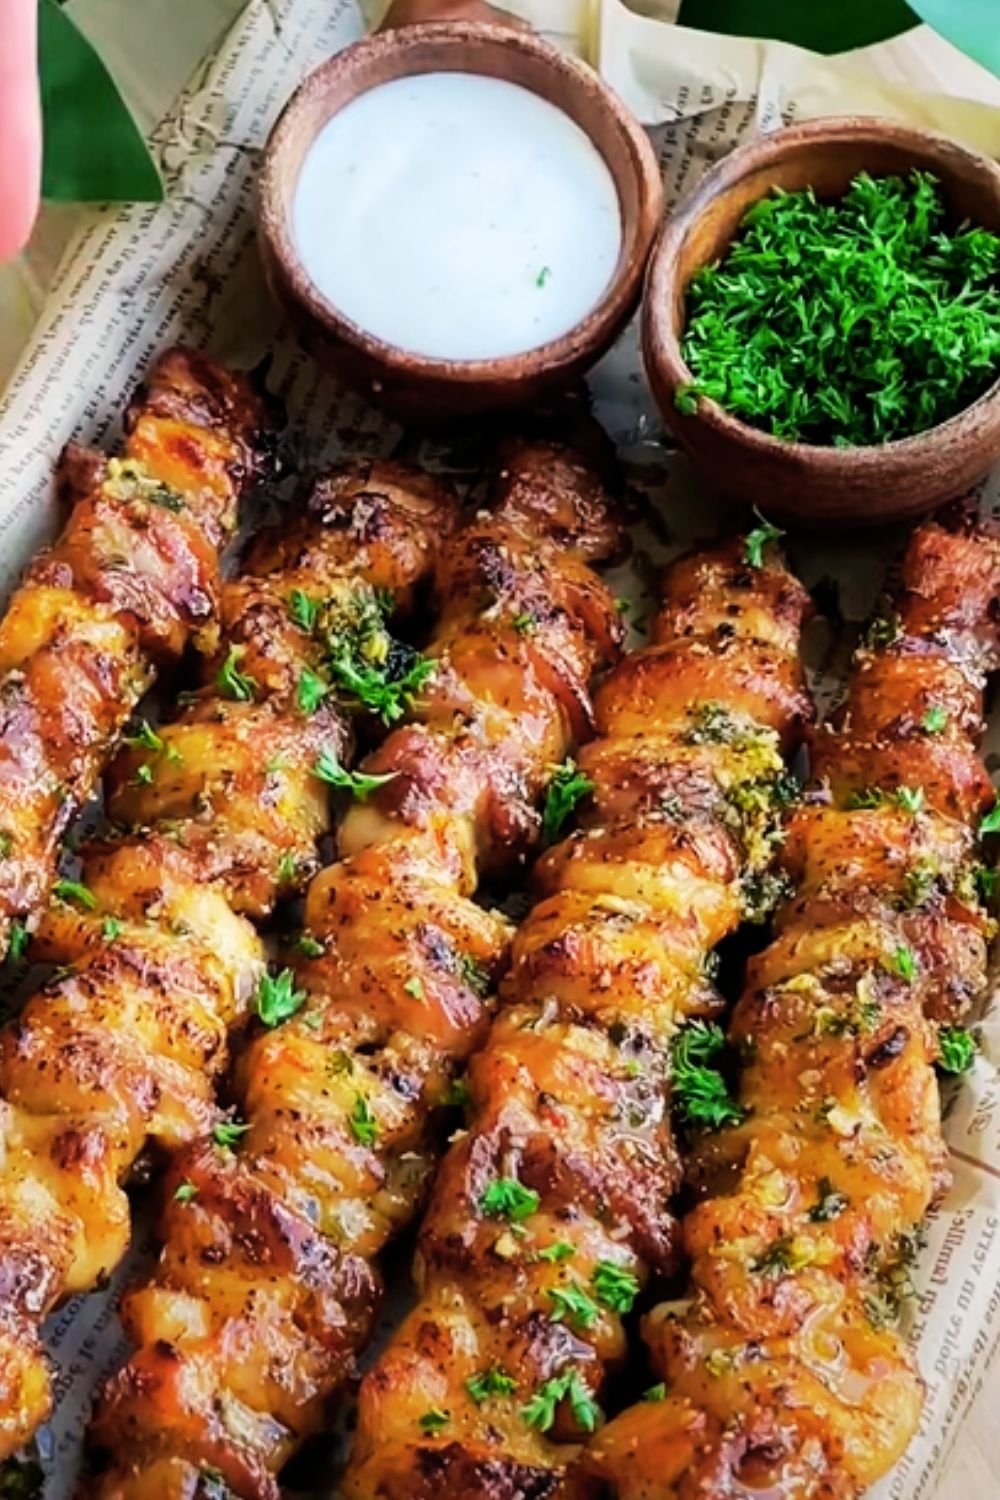
Step 5: Thread onto Skewers Thread 4-5 coated chicken pieces onto each skewer, leaving small gaps between pieces for proper air circulation. If using wooden skewers, soak them in water for 30 minutes beforehand to prevent burning.

Air Frying Instructions
Step 6: Preheat the Air Fryer Set your air fryer to 380°F (193°C) and preheat for 3-4 minutes. Preheating ensures immediate searing when the skewers go in.
Step 7: Cook the Skewers Place skewers in the air fryer basket, ensuring they don’t touch each other. Cook for 12-15 minutes, flipping once halfway through. The internal temperature should reach 165°F (74°C).
Step 8: Final Crisping If you desire extra crispiness, increase temperature to 400°F (204°C) for the final 2-3 minutes.
Nutritional Information and Benefits
| Nutrient | Per Serving (2 skewers) | Daily Value % |
|---|---|---|
| Calories | 285 | 14% |
| Protein | 32g | 64% |
| Carbohydrates | 12g | 4% |
| Fat | 12g | 18% |
| Saturated Fat | 4g | 20% |
| Cholesterol | 95mg | 32% |
| Sodium | 520mg | 23% |
| Fiber | 1g | 4% |
| Calcium | 180mg | 18% |
| Iron | 1.5mg | 8% |
Health Benefits
The air frying method significantly reduces the oil content compared to traditional frying while maintaining excellent taste and texture. Chicken provides high-quality complete protein essential for muscle maintenance and growth. Parmesan cheese contributes calcium for bone health, while garlic offers potential cardiovascular benefits and immune system support.
Cooking Time and Temperature Guide
Getting the timing and temperature right is crucial for perfect results. I’ve tested various combinations to provide you with foolproof guidelines.
| Chicken Cut | Temperature | Time | Internal Temp |
|---|---|---|---|
| Breast Cubes (1.5″) | 380°F | 12-14 min | 165°F |
| Thigh Cubes (1.5″) | 380°F | 14-16 min | 165°F |
| Tenderloins | 375°F | 10-12 min | 165°F |
| Mini Drumsticks | 385°F | 16-18 min | 165°F |
Air Fryer Model Adjustments
Different air fryer models may require slight adjustments. Basket-style fryers typically cook more evenly, while oven-style units might need rotation halfway through cooking.
Compact Models (2-3 quarts): Reduce cooking time by 1-2 minutes Large Models (5+ quarts): May need additional 1-2 minutes for proper browning Convection Style: Reduce temperature by 10-15°F
Flavor Variations and Customizations
One of the aspects I love most about this recipe is its adaptability. Over time, I’ve developed several variations that cater to different taste preferences.
International Flavor Profiles
Mediterranean Style Replace Italian seasoning with oregano, add lemon zest, and include crumbled feta cheese in the coating.
Asian-Inspired Substitute parmesan with sesame seeds, add ginger powder, and finish with a drizzle of sesame oil.
Mexican Fusion Include chili powder, cumin, and a pinch of cayenne in the coating, then serve with lime wedges.
Herb-Crusted Version Mix fresh chopped herbs like rosemary, thyme, and parsley into the breadcrumb mixture for an aromatic twist.
Dietary Modifications
Keto-Friendly Replace breadcrumbs with finely ground pork rinds or almond flour for a low-carb option.
Gluten-Free Use gluten-free breadcrumbs or crushed rice crackers as a substitute for panko.
Dairy-Free Omit parmesan and increase nutritional yeast for a similar umami flavor.

Expert Tips for Perfect Results
Through countless batches, I’ve learned several techniques that consistently produce exceptional results.
Preparation Secrets
Uniform Sizing: Keep chicken pieces consistent in size for even cooking. I use a kitchen scale to ensure pieces are roughly the same weight.
Proper Drying: Thoroughly pat chicken dry before seasoning. Excess moisture prevents proper browning and can make the coating soggy.
Resting Time: Let coated chicken rest for 10-15 minutes before cooking. This allows the coating to set and adhere better.
Coating Techniques
Double Coating Method: For extra crispiness, dip chicken in beaten egg before the breadcrumb mixture.
Pressing Technique: Gently press the coating onto the chicken rather than just rolling. This ensures better adhesion.
Fresh Grating: Always grate parmesan fresh when possible. The oils in fresh cheese contribute significantly to flavor and browning.
Air Fryer Optimization
Don’t Overcrowd: Leave space between skewers for proper air circulation. Cook in batches if necessary.
Strategic Placement: Position thicker pieces toward the center of the basket where heat circulation is strongest.
Monitoring: Check doneness at the minimum time recommendation to prevent overcooking.
Serving Suggestions and Pairings
These versatile skewers complement numerous side dishes and can be served in various settings.
Main Course Pairings
Rice and Grain Options Garlic herb rice pilaf, quinoa salad, or wild rice stuffing all pair beautifully with the rich flavors of the chicken.
Vegetable Sides Roasted Brussels sprouts, grilled asparagus, or sautéed zucchini provide fresh contrasts to the savory skewers.
Pasta Combinations Serve over creamy fettuccine Alfredo or toss with penne in olive oil and fresh herbs.
Appetizer Presentations
Party Platters Arrange on a large platter with various dipping sauces like ranch, marinara, or honey mustard.
Elegant Appetizers Serve individual skewers on small plates with a drizzle of balsamic glaze.
Sauce Accompaniments
| Sauce Type | Flavor Profile | Best Pairing |
|---|---|---|
| Ranch Dressing | Cool, Creamy | Classic comfort |
| Marinara | Tangy, Herb-forward | Italian theme |
| Honey Mustard | Sweet, Tangy | Balanced contrast |
| Garlic Aioli | Rich, Garlicky | Flavor enhancement |
| Buffalo Sauce | Spicy, Vinegary | Heat lovers |
| Tzatziki | Cool, Cucumber | Mediterranean |
Storage and Reheating Guidelines
Proper storage ensures you can enjoy leftovers with minimal quality loss.
Refrigerator Storage
Store cooled skewers in airtight containers for up to 4 days. Remove from skewers before storing to save space and prevent the wood from absorbing flavors.
Freezer Storage
These skewers freeze well for up to 3 months. Wrap individually in plastic wrap, then place in freezer bags. Label with the date and cooking instructions.
Reheating Methods
Air Fryer Reheating (Recommended) : 350°F for 3-4 minutes restores crispiness beautifully
Oven Method : 375°F for 8-10 minutes on a wire rack over a baking sheet
Microwave (Quick but less crispy) : 30-second intervals on 70% power until heated through
Troubleshooting Common Issues
Even experienced cooks encounter challenges. Here are solutions to the most common problems I’ve encountered.
Coating Problems
Coating Falls Off This usually occurs when the chicken isn’t properly dried or the oil coating is insufficient. Ensure chicken is completely dry and evenly coated with oil before applying breadcrumbs.
Uneven Browning Often caused by overcrowding or inconsistent piece sizes. Cook in smaller batches and cut chicken uniformly.
Soggy Coating Typically results from excess moisture or insufficient air circulation. Pat chicken very dry and don’t overcrowd the air fryer.
Texture Issues
Dry Chicken Overcooking is the primary cause. Use a meat thermometer and remove at exactly 165°F. Chicken thighs are more forgiving than breasts.
Tough Texture Can result from using chicken that’s been frozen and thawed improperly. Fresh chicken or properly thawed frozen chicken works best.
Make-Ahead Strategies
Planning ahead makes weeknight dinners effortless.
Prep-Ahead Options
Complete Coating: Coat chicken pieces and store covered in the refrigerator for up to 24 hours before cooking.
Marinade Method: Marinate chicken in olive oil and seasonings overnight for enhanced flavor penetration.
Batch Preparation: Prepare multiple batches of coating mixture and store in sealed containers for quick weeknight meals.
Meal Prep Integration
These skewers work excellently in meal prep containers. Pair with roasted vegetables and quinoa for complete, balanced meals that reheat beautifully.
Equipment Recommendations
Having the right tools makes this recipe even more successful.
Essential Equipment
Air Fryer Size: A 4-5 quart model accommodates most family sizes effectively.
Skewer Types: Metal skewers conduct heat and cook more evenly, while wooden skewers are disposable and great for parties.
Meat Thermometer: Instant-read thermometers ensure perfect doneness without guesswork.
Helpful Accessories
Grill Mats: Prevent small pieces from falling through air fryer grates.
Silicone Tongs: Make flipping and removal easier without scratching non-stick surfaces.
Fine Grater: For fresh parmesan and garlic preparation.
Frequently Asked Questions
Q: Can I use frozen chicken for this recipe? Yes, but ensure it’s completely thawed and patted dry. Frozen chicken often retains more moisture, which can affect coating adhesion and crispiness.
Q: What’s the best size for chicken pieces? I recommend 1.5-inch cubes. This size ensures even cooking while providing enough surface area for the coating to adhere properly.
Q: How do I prevent wooden skewers from burning? Soak wooden skewers in water for at least 30 minutes before use. You can also wrap the exposed ends in aluminum foil for extra protection.
Q: Can I make these without breadcrumbs? Absolutely! Try crushed cornflakes, ground nuts, or even finely chopped bacon for unique coating alternatives.
Q: Why isn’t my coating getting crispy enough? Ensure your air fryer is properly preheated, don’t overcrowd the basket, and consider extending cooking time by 1-2 minutes while monitoring closely.
Q: Can I prepare these ahead for a party? Yes! You can coat the chicken up to 24 hours ahead and store covered in the refrigerator. Cook just before serving for best results.
Q: What internal temperature should I aim for? Always cook chicken to an internal temperature of 165°F (74°C) as measured by an instant-read thermometer inserted into the thickest part.
Q: How do I know when they’re perfectly done? Look for a golden-brown exterior and use a meat thermometer to confirm internal temperature. The coating should be crispy and the juices should run clear.
Q: Can I double the recipe? Yes, but you’ll need to cook in batches to avoid overcrowding. Maintain the same temperature and timing for each batch.
Q: What’s the best way to serve these at a party? Arrange on a warming tray or in a slow cooker on warm setting. Provide various dipping sauces and small plates for easy serving.
These Air Fryer Garlic Parmesan Chicken Skewers have become a staple in my kitchen because they consistently deliver restaurant-quality results with minimal effort. The combination of crispy coating, juicy chicken, and bold flavors makes them perfect for everything from casual family dinners to entertaining guests. The versatility of the recipe means you can adapt it to various dietary needs and flavor preferences while maintaining the same delicious core that makes these skewers so special.
Remember that practice makes perfect. Each air fryer model behaves slightly differently, so don’t be discouraged if your first batch isn’t exactly as expected. Pay attention to how your specific model cooks, adjust timing accordingly, and soon you’ll be creating these crispy, flavorful skewers with confidence every time. The key is maintaining proper temperature, ensuring adequate spacing for air circulation, and not rushing the process. With these guidelines, you’ll have a go-to recipe that never fails to impress.