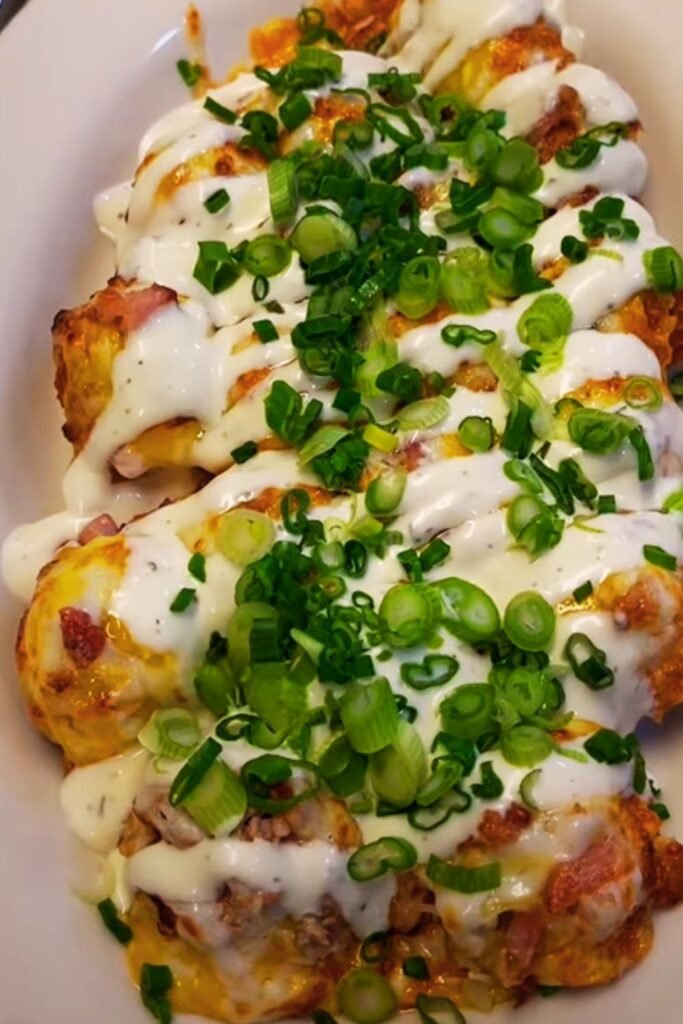
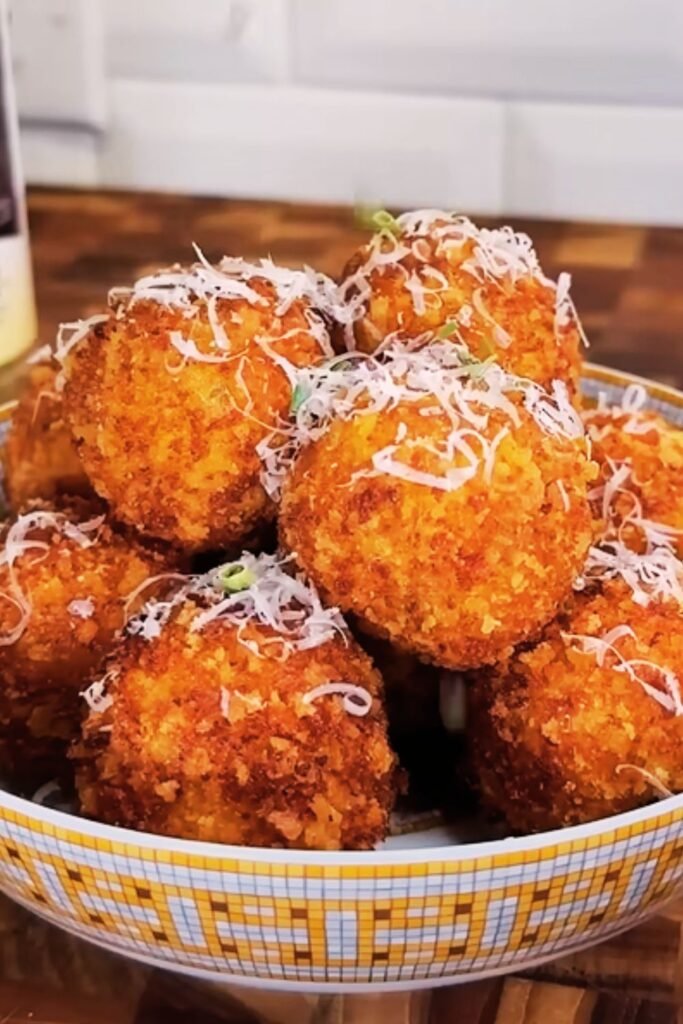
When I first discovered loaded mashed potato balls, I knew I’d stumbled upon something truly special. These golden, crispy spheres of pure comfort food heaven transformed my leftover mashed potatoes into the star of every gathering. Picture this: creamy mashed potatoes loaded with bacon, cheese, and chives, rolled into perfect balls, coated in breadcrumbs, and fried to golden perfection. Each bite delivers that satisfying contrast between the crunchy exterior and the warm, loaded interior that makes these irresistible.
I’ve been perfecting this recipe for years, and I can confidently say these loaded mashed potato balls are the ultimate crowd-pleaser. Whether you’re hosting a party, looking for a creative way to use leftover mashed potatoes, or simply craving the ultimate comfort food, these little gems deliver every single time.
What Makes Loaded Mashed Potato Balls So Special
The beauty of loaded mashed potato balls lies in their incredible versatility and the way they transform simple ingredients into something extraordinary. Unlike regular potato appetizers, these combine multiple textures and flavors in one perfect bite. The crispy, golden exterior gives way to a creamy, loaded center that’s packed with all your favorite potato toppings.
What sets my version apart is the careful balance of ingredients and the technique I use to achieve that perfect crispy coating. I’ve experimented with countless variations, and I’ve discovered that the secret lies in getting the moisture content just right and using a three-stage breading process that creates an incredibly satisfying crunch.
Essential Ingredients for Perfect Loaded Mashed Potato Balls
Creating exceptional loaded mashed potato balls starts with selecting the right ingredients. Each component plays a crucial role in achieving that perfect balance of flavor and texture that makes these appetizers so addictive.
Core Ingredients
Mashed Potatoes: The foundation of our recipe requires 4 cups of cold, day-old mashed potatoes. I always recommend using russet or Yukon Gold potatoes for the best texture. The potatoes should be well-seasoned but not too wet or loose.
Cheese: Sharp cheddar cheese is my go-to choice, using about 1½ cups of freshly shredded cheese. The sharpness cuts through the richness of the potatoes while adding that essential loaded potato flavor.
Bacon: Six strips of thick-cut bacon, cooked until crispy and crumbled into small pieces. I prefer thick-cut because it maintains better texture and doesn’t get lost in the mixture.
Chives: Fresh chives provide that classic loaded potato flavor and a beautiful pop of color. About ¼ cup of finely chopped chives works perfectly.
Sour Cream: Two tablespoons of sour cream add tanginess and help bind the mixture together while maintaining that authentic loaded potato taste.
Breading Components
All-Purpose Flour: One cup for the initial coating that helps the egg wash adhere properly.
Eggs: Two large eggs, beaten with a tablespoon of milk, create the binding layer for our breadcrumb coating.
Panko Breadcrumbs: Two cups of panko breadcrumbs create that incredibly crispy exterior. I prefer panko over regular breadcrumbs because they stay crispier longer and create better texture.
Step-by-Step Preparation Guide
Creating perfect loaded mashed potato balls requires attention to detail and proper technique. I’ll walk you through each step to ensure your results are consistently excellent.
Preparing the Potato Mixture
Start by combining your cold mashed potatoes with the shredded cheese, crumbled bacon, chopped chives, and sour cream in a large mixing bowl. The mixture should hold together well when squeezed but not be too wet. If your mashed potatoes seem too moist, add a tablespoon of flour to help bind everything together.
Season the mixture with salt and pepper to taste, keeping in mind that the bacon and cheese already add considerable flavor. Mix everything thoroughly but gently to avoid overworking the potatoes, which can make them gluey.
Shaping the Balls
Using clean hands or a small ice cream scoop, portion the mixture into golf ball-sized portions. Roll each portion between your palms to create smooth, round balls. The key is to pack them firmly enough that they hold together but not so tightly that they become dense.
Place the shaped balls on a parchment-lined baking sheet and refrigerate for at least 30 minutes. This chilling step is crucial as it helps the balls maintain their shape during the breading and frying process.
The Three-Stage Breading Process
This is where the magic happens. Set up three shallow dishes: one with flour, one with beaten eggs and milk, and one with panko breadcrumbs. Working with one ball at a time, roll each one first in flour, shaking off excess, then dip in the egg mixture, ensuring complete coverage, and finally roll in panko breadcrumbs, pressing gently to help them adhere.
For extra crispiness, I sometimes do a double coating by dipping the breaded balls back into the egg mixture and rolling in breadcrumbs again. This creates an exceptionally thick, crunchy coating that stays crispy longer.
Cooking Methods and Techniques
I’ve perfected multiple cooking methods for loaded mashed potato balls, each offering different advantages depending on your preferences and equipment.
Deep Frying Method
Deep frying produces the crispiest results with the most even golden color. Heat oil to 350°F in a heavy-bottomed pot or deep fryer. Carefully lower the potato balls into the oil using a slotted spoon, being careful not to crowd the pot. Fry for 3-4 minutes until golden brown and crispy.
The key to successful deep frying is maintaining consistent oil temperature. Too hot, and the outside burns before the inside heats through. Too cool, and the balls absorb too much oil and become greasy.
Air Fryer Method
For a healthier option, the air fryer produces excellent results with significantly less oil. Preheat your air fryer to 380°F and lightly spray the potato balls with cooking oil. Cook for 8-10 minutes, shaking the basket halfway through to ensure even browning.
Baking Method
Baking offers the most hands-off approach and works well for large batches. Preheat your oven to 425°F and place the breaded balls on a parchment-lined baking sheet. Spray lightly with cooking oil and bake for 15-20 minutes, turning once halfway through.

Nutritional Information and Dietary Considerations
Understanding the nutritional profile of loaded mashed potato balls helps you make informed decisions about serving sizes and dietary accommodations.
| Nutritional Component | Per Ball (Average) | Per 4-Ball Serving |
|---|---|---|
| Calories | 145 | 580 |
| Total Fat | 8g | 32g |
| Saturated Fat | 4g | 16g |
| Cholesterol | 35mg | 140mg |
| Sodium | 280mg | 1,120mg |
| Total Carbohydrates | 14g | 56g |
| Dietary Fiber | 1g | 4g |
| Protein | 6g | 24g |
| Calcium | 85mg | 340mg |
| Iron | 0.8mg | 3.2mg |
These values can vary significantly based on the specific ingredients used and cooking method chosen. Deep-fried versions will have higher fat content, while baked versions will be somewhat lower in calories and fat.
Flavor Variations and Creative Adaptations
One of the things I love most about loaded mashed potato balls is how easily they adapt to different flavor profiles and dietary needs.
International Flavor Variations
Mexican-Inspired: Replace bacon with chorizo, use pepper jack cheese, and add diced jalapeños and cilantro instead of chives. Serve with salsa and guacamole for dipping.
Italian-Style: Incorporate sun-dried tomatoes, fresh basil, and mozzarella cheese. Add a touch of garlic powder and serve with marinara sauce.
Mediterranean Twist: Use feta cheese, chopped kalamata olives, and fresh dill. These pair beautifully with tzatziki sauce.
Dietary Adaptations
Vegetarian Version: Simply omit the bacon and add extra cheese or incorporate sautéed mushrooms for umami flavor.
Gluten-Free Option: Replace regular breadcrumbs with gluten-free panko or crushed gluten-free crackers. Ensure all other ingredients are certified gluten-free.
Lower-Calorie Version: Use reduced-fat cheese and turkey bacon, and opt for baking or air frying instead of deep frying.
Serving Suggestions and Presentation Ideas
The presentation of loaded mashed potato balls can elevate them from simple appetizer to restaurant-quality dish. I’ve discovered several serving strategies that consistently impress guests.
Dipping Sauce Pairings
Classic Ranch: The cool, creamy flavor complements the rich, loaded potato flavor perfectly.
Garlic Aioli: A sophisticated option that adds depth without overwhelming the potato flavors.
Spicy Sriracha Mayo: Mix equal parts mayonnaise and sriracha for those who enjoy a kick with their comfort food.
Herbed Sour Cream: Combine sour cream with fresh chives, dill, and a squeeze of lemon juice.
Plating and Garnishing
I like to serve these on a wooden board or slate platter for a rustic presentation. Arrange the balls in odd numbers (groups of 3 or 5 look most appealing) and provide small bowls of various dipping sauces. Fresh chive sprigs and a light dusting of paprika add color and visual interest.
For formal occasions, serve individual portions on small plates with a dollop of sour cream and a sprinkle of fresh herbs. This elevated presentation makes them suitable for more upscale gatherings.
Storage and Reheating Guidelines
Proper storage techniques ensure your loaded mashed potato balls maintain their quality and safety for future enjoyment.
Short-Term Storage
Freshly made potato balls can be stored in the refrigerator for up to 3 days in an airtight container. Layer them with parchment paper to prevent sticking and maintain their shape.
Freezing Instructions
These freeze exceptionally well, making them perfect for meal prep or entertaining. Freeze the shaped, uncooked balls on a baking sheet until solid, then transfer to freezer bags. They’ll keep for up to 3 months.
You can also freeze cooked potato balls, though the texture may be slightly less crispy after reheating. Freeze on a baking sheet first, then store in airtight containers with parchment paper between layers.
Reheating Methods
Oven Method: Preheat to 375°F and bake for 8-10 minutes until heated through and crispy.
Air Fryer: Reheat at 350°F for 3-4 minutes, which helps restore crispiness better than other methods.
Microwave: While quickest, this method softens the coating. Use 30-second intervals on medium power to avoid overheating.
Troubleshooting Common Issues
Through years of making these potato balls, I’ve encountered and solved numerous common problems that home cooks face.
Balls Falling Apart During Cooking
This usually happens when the mixture is too wet or warm. Ensure your mashed potatoes are cold and well-drained. If the mixture seems loose, add a tablespoon of flour and chill longer before shaping.
Coating Not Adhering Properly
Make sure each ball is completely dry before breading, and press the breadcrumbs firmly onto the surface. The three-stage breading process is crucial for proper adhesion.
Uneven Browning
This typically occurs when the oil temperature fluctuates or the balls are crowded during cooking. Maintain consistent temperature and cook in smaller batches for even results.
Interior Not Heating Through
If the outside browns too quickly while the inside remains cold, your oil temperature is too high. Reduce heat and cook slightly longer to ensure even heating throughout.
Advanced Tips for Professional Results
After perfecting this recipe over countless iterations, I’ve discovered several professional techniques that consistently produce superior results.
Temperature Control
Using a reliable thermometer for oil temperature makes an enormous difference in results. I invest in a good digital thermometer and never guess at temperatures.
Texture Enhancement
Adding a small amount of cream cheese to the potato mixture creates an incredibly smooth, rich texture that elevates the entire dish. Just 2 tablespoons per batch makes a noticeable difference.
Flavor Depth
I sometimes add a touch of garlic powder and onion powder to the potato mixture for additional depth without overwhelming the loaded potato flavors.
Coating Innovation
Mixing a small amount of grated Parmesan cheese into the breadcrumbs creates an extra layer of flavor and helps achieve a more golden color.
Seasonal and Holiday Adaptations
These versatile potato balls adapt beautifully to seasonal ingredients and holiday themes.
Fall Variations
Incorporate roasted butternut squash into the potato mixture and add sage instead of chives for an autumn-inspired version. The subtle sweetness pairs beautifully with the savory elements.
Holiday Versions
For Thanksgiving, add leftover turkey and stuffing to create unique holiday appetizers. Christmas versions might include cranberries and thyme for festive flavors.
Summer Adaptations
Light summer versions can incorporate fresh corn kernels and jalapeños for a southwestern flair that’s perfect for outdoor gatherings.
Cost Analysis and Budget-Friendly Tips
Understanding the economics of making loaded mashed potato balls helps you plan budget-friendly meals and entertaining options.
| Ingredient Category | Approximate Cost | Cost-Saving Tips |
|---|---|---|
| Potatoes (5 lbs) | $3.00 | Buy in bulk when on sale |
| Cheese (8 oz block) | $4.50 | Shred your own instead of pre-shredded |
| Bacon (1 lb) | $6.00 | Watch for sales and freeze extras |
| Eggs (dozen) | $2.50 | Buy larger quantities when discounted |
| Breadcrumbs | $2.00 | Make your own from day-old bread |
| Total Cost | $18.00 | Makes approximately 24 balls |
| Cost per ball | $0.75 | Significantly less than restaurant appetizers |
Money-Saving Strategies
I’ve found that making these during potato sales results in significant savings. Buying cheese in blocks and shredding yourself saves about 30% compared to pre-shredded options. Making your own breadcrumbs from day-old bread eliminates that expense entirely while often producing superior texture.
Scaling Recipes for Different Occasions
Understanding how to adjust quantities for different group sizes ensures you always have the right amount.
Small Gatherings (4-6 people)
The base recipe produces about 16-20 balls, perfect for small gatherings where these serve as substantial appetizers alongside other dishes.
Large Parties (20+ people)
Triple the recipe and consider setting up stations with different dipping sauces. Prepare components ahead of time and fry in batches as guests arrive to ensure optimal freshness.
Meal Prep Portions
For weekly meal prep, I make double batches and freeze half for future use. This provides quick appetizer options for unexpected guests or busy weeknight meals.
Frequently Asked Questions
Q: Can I make loaded mashed potato balls ahead of time?
Absolutely! I actually prefer making them a day ahead. Shape the balls and complete the breading process, then refrigerate overnight. This extended chilling time helps them hold their shape better during cooking and often results in crispier exteriors.
Q: What’s the best way to reheat leftover potato balls?
The air fryer produces the best reheating results, restoring much of the original crispiness. Heat at 350°F for 3-4 minutes. The oven works well too at 375°F for 8-10 minutes. Avoid the microwave if you want to maintain any crispiness.
Q: Can I use instant mashed potatoes for this recipe?
While fresh mashed potatoes produce superior results, I’ve successfully used high-quality instant mashed potatoes in a pinch. The key is making them slightly thicker than package directions suggest and ensuring they’re completely cool before mixing in the other ingredients.
Q: How do I prevent the cheese from leaking out during cooking?
This happens when the balls aren’t sealed properly or the cheese pieces are too large. Make sure to distribute the cheese evenly throughout the mixture rather than creating pockets, and ensure the potato mixture completely encases all ingredients.
Q: Can I bake these instead of frying for a healthier option?
Definitely! While the texture differs slightly from fried versions, baked potato balls are delicious and significantly lower in fat. Bake at 425°F for 15-20 minutes, turning once halfway through. A light spray of cooking oil helps achieve better browning.
Q: What’s the ideal size for potato balls?
I find golf ball size (about 1½ inches in diameter) works perfectly. This size ensures they cook evenly while providing a satisfying portion. Smaller balls can overcook quickly, while larger ones may not heat through properly.
Q: How long do these keep in the freezer?
Properly stored frozen potato balls maintain quality for up to 3 months. I freeze them on baking sheets first, then transfer to freezer bags with dates labeled. They can be cooked directly from frozen, just add a few extra minutes to the cooking time.
Q: Can I make these gluten-free?
Yes! Replace the regular flour with gluten-free flour blend and use gluten-free panko breadcrumbs or crushed gluten-free crackers. Ensure all other ingredients, including any seasonings, are certified gluten-free.
These loaded mashed potato balls have become my signature appetizer, and I’m confident they’ll become yours too. The combination of creamy potatoes, crispy coating, and loaded flavors creates an irresistible treat that works for any occasion. Whether you’re using leftover mashed potatoes or making them specifically for this recipe, these golden spheres of comfort food perfection never fail to impress. The versatility in flavors, cooking methods, and serving options means you’ll never get bored with this recipe, and your guests will always be asking for more.